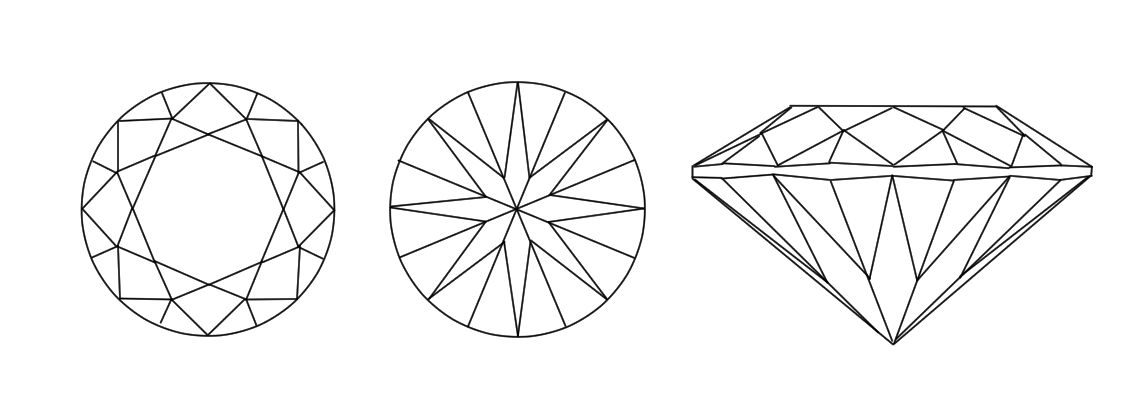
Drawing a perfect round diamond is difficult, many artists struggle to draw the perfect round diamond. This is because diamonds, much like other gemstones, are often characterized by having flat, geometric surface patterns.
A perfect round diamond drawing can be intimidating to even to an expert. Drawing a diamond is an exact science and let me prove it!!
When drawing a diamond, it's important to understand the science behind its creation. The angles and proportions of the diamond's facets determine how light is reflected and refracted within the stone, creating its signature sparkle and fire.
While it may seem overwhelming, with a little bit of knowledge and practice, anyone can learn to draw a perfect diamond. By following the proper techniques and understanding the science behind its creation, beginners can create stunning diamond designs with ease.
The diamond is divided in 4 basic parts, they are table, crown, gridle and pavilion and A Round diamond has 58 facets that is spread across them. Each facets have their own exact angle which will be explained later in our blog.
How to draw a round diamond? What are the best round diamond angles? How do you draw a realistic diamond shape? What is the perfect diamond shape? What is the hardest diamond shape to set? How do you shade a diamond shape? All this question will be answered here.
To draw what are the stationery and the tools that we need. Here is all the thing that we need:
Paper - Choose a smooth, untextured paper with a heavy weight. This will prevent smudging and allow for precise lines.

Pencil - Use a high-quality, sharp pencil with a hard lead, such as an 2B, HB, H or 2H. This will allow for fine lines and detailed drawing.

Ruler - Use a straight edge ruler to create straight lines and precise measurements.

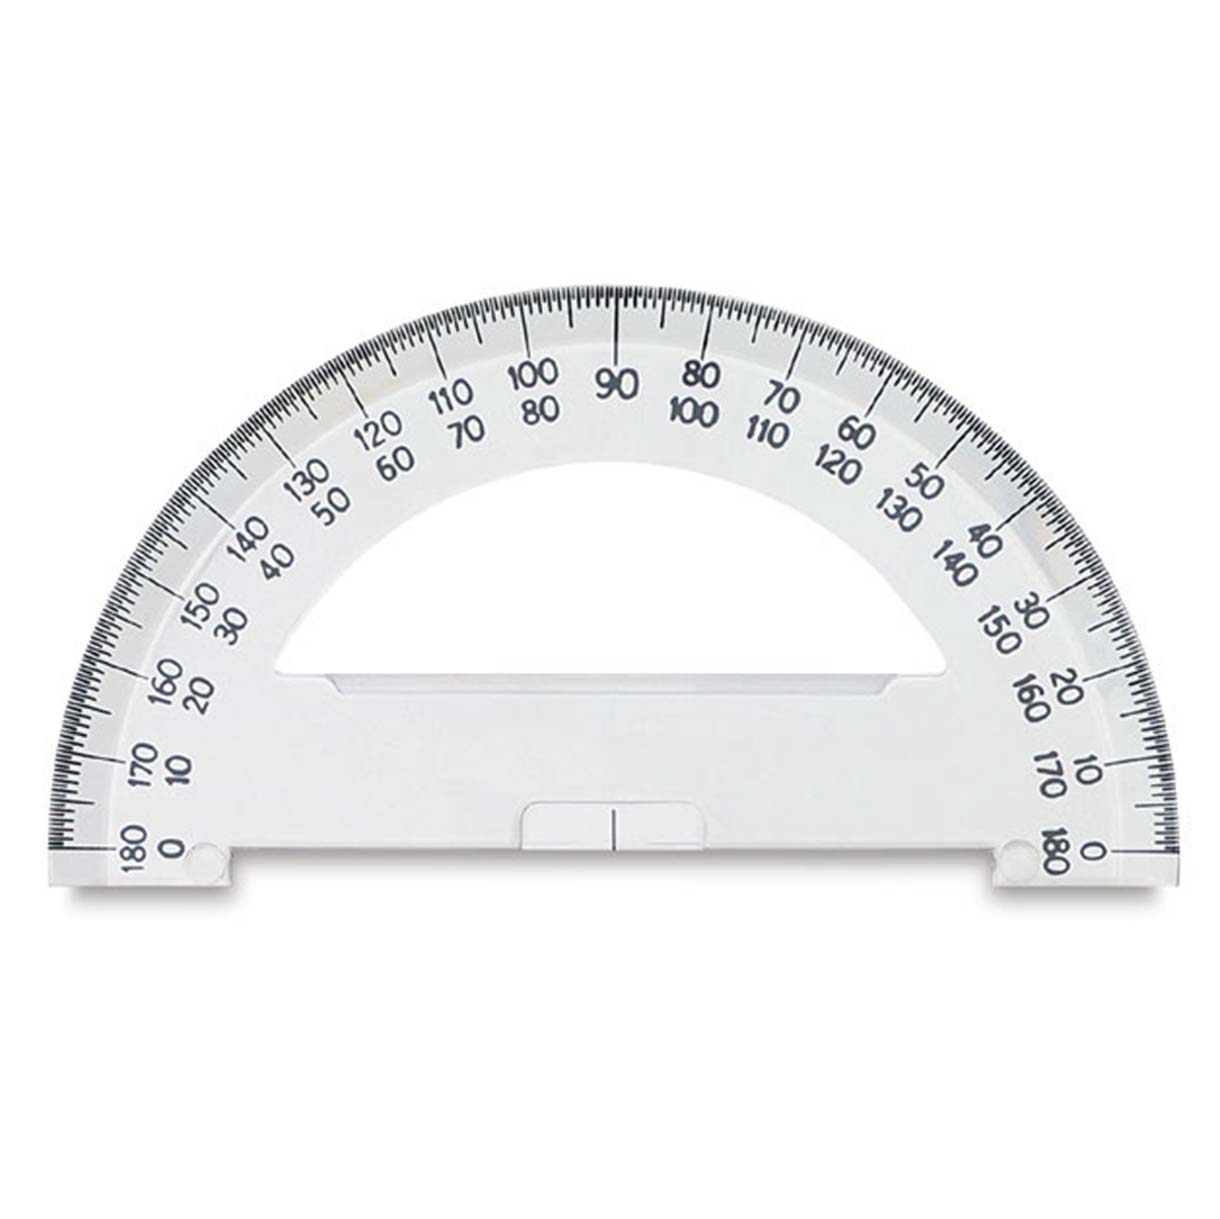
Protractor - A protractor is a helpful tool for measuring and drawing angles accurately.
Compass - A compass is useful for drawing circles and creating the initial shape of the diamond.

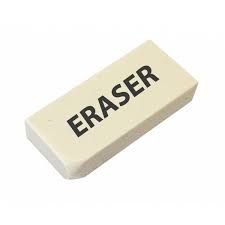
Eraser - Use a soft eraser to remove any mistakes or unwanted lines.
Ink pen - An ink pen with a fine tip can be used to create bold, defined lines and add depth to your drawing.
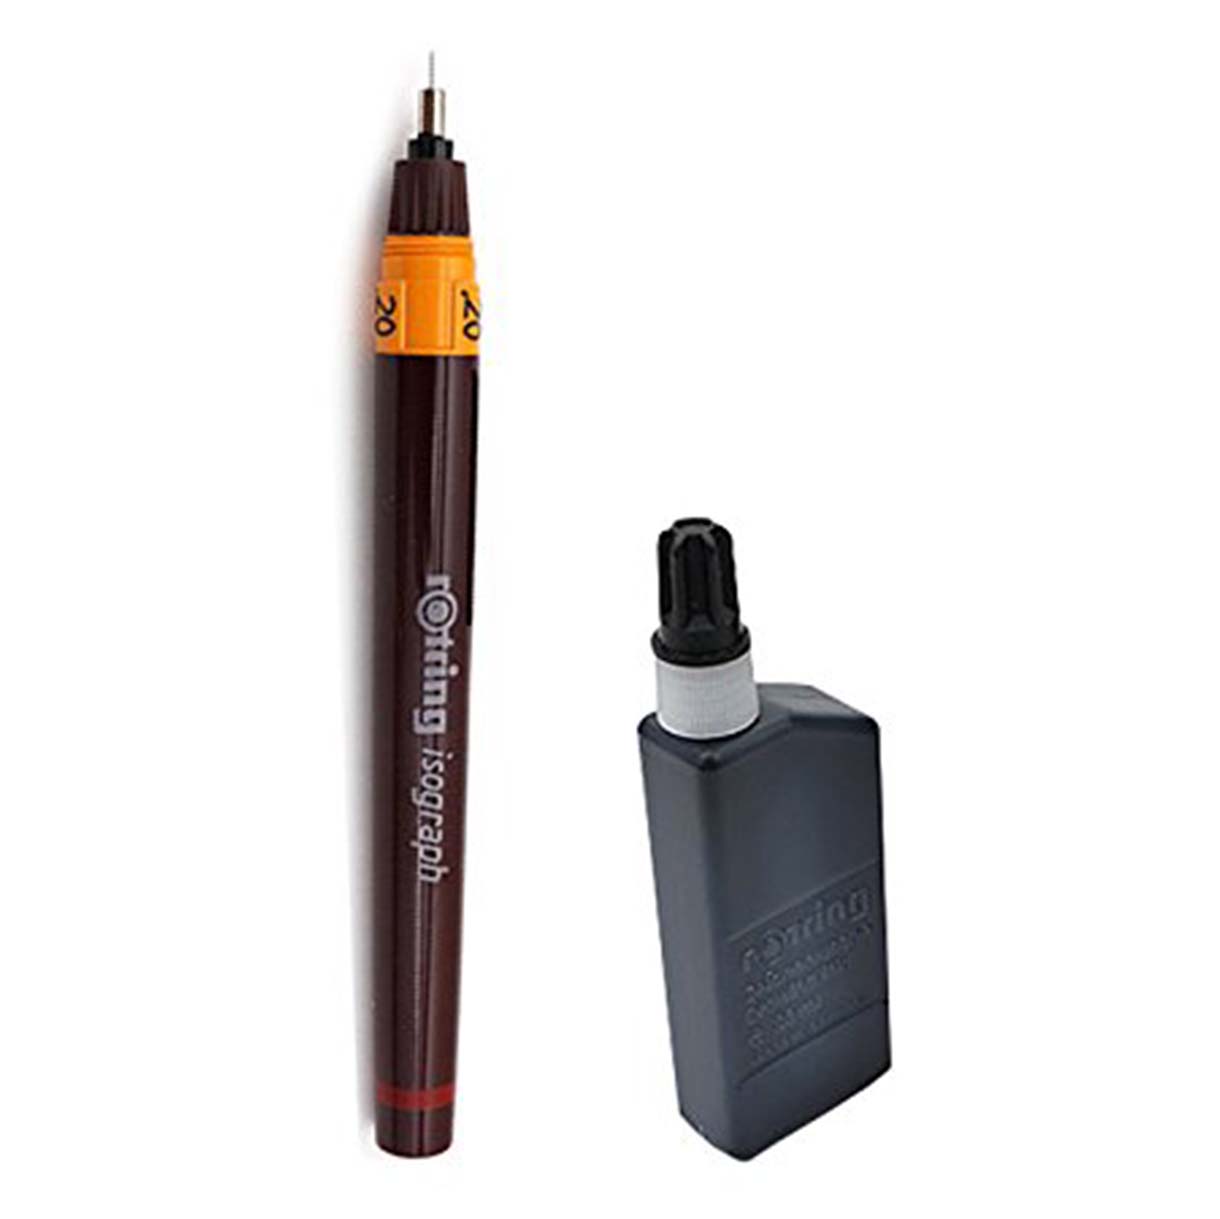
Table or board - A flat and stable surface, such as a table or board, is essential for creating accurate drawings and preventing smudging.


By using this list of materials, beginners can create stunning diamond designs with precision and ease.
Describing the different parts of the diamond and their aspects in regards to facets and angles is an important aspect of this article. Here is a detailed description of each part of the diamond and its importance:
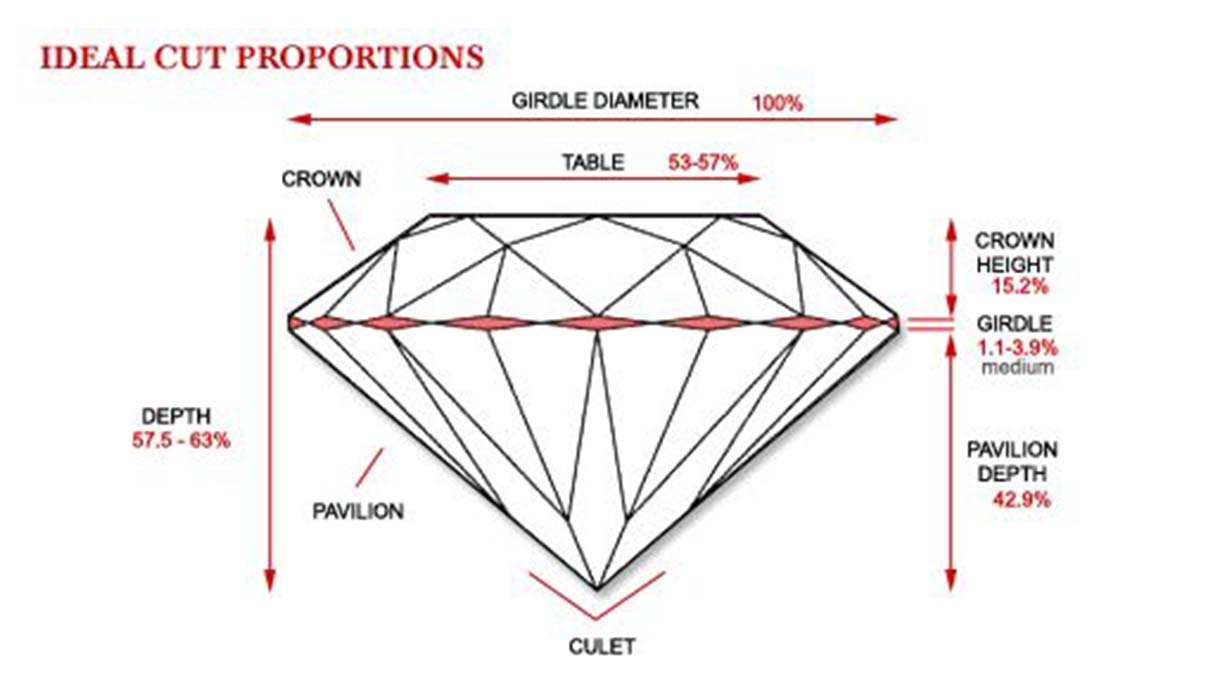
Table - The table is the largest facet on the top of the diamond. It serves as the entry point for light into the diamond.
Crown - The crown is the upper portion of the diamond, located between the table and the girdle. It consists of a series of facets that reflect and refract light to create the diamond's sparkle and fire.
Girdle - The girdle is the widest part of the diamond, where the crown and pavilion meet. It separates the upper and lower halves of the diamond.
Pavilion - The pavilion is the lower portion of the diamond, located below the girdle. It consists of a series of facets that reflect and refract light to create the diamond's brilliance.
Culet - The culet is the small facet at the bottom of the diamond. It helps to prevent chipping and provides a point for light to exit the diamond.
When drawing a diamond, it's important to consider the shape of the diamond and the angles of each facet. The ideal angles for each facet will depend on the shape of the diamond, as each shape has its own unique set of ideal proportions.
For example, a round brilliant diamond typically has 58 facets with specific angles and proportions. The table should be about 55% of the diameter of the diamond, while the crown angle should be between 33.5 and 35.5 degrees, and the pavilion angle should be between 40.6 and 41 degrees.
By understanding the ideal proportions and angles for each shape of diamond, beginners can create accurate and stunning diamond designs.
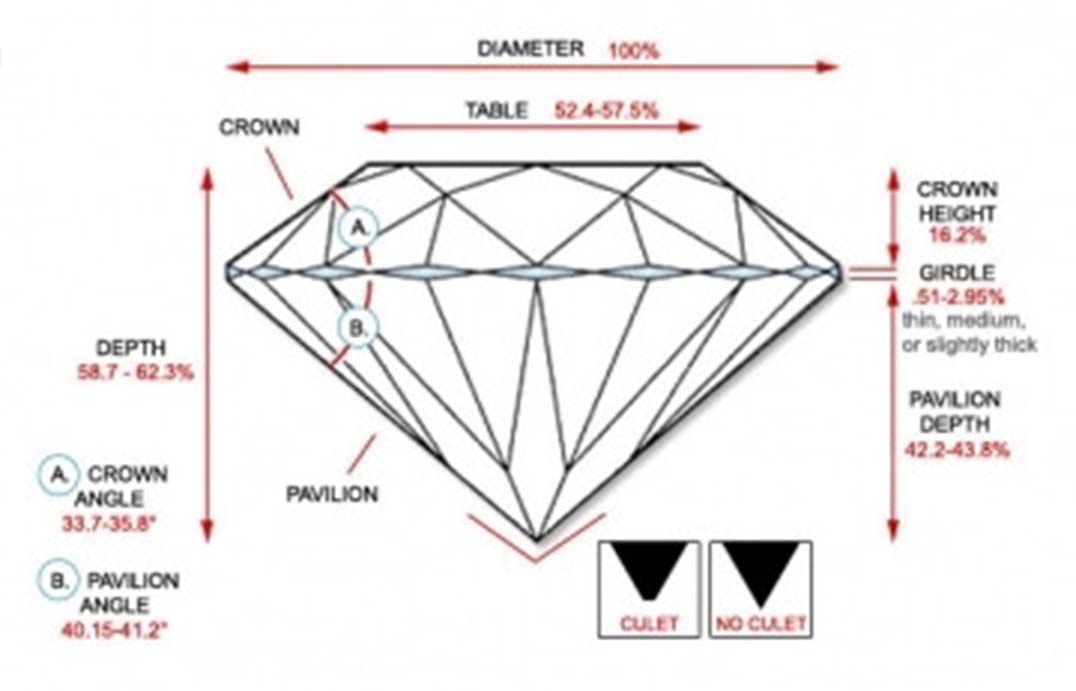
A round brilliant diamond has 58 facets, divided into three main parts: the crown, girdle, and pavilion. Each part has specific angles that are crucial for reflecting and refracting light to create the diamond's sparkle and brilliance.
Here are the angles for each part:
Crown:
Table: This is the largest and most visible facet on the diamond. It is located at the top and should be flat and level. The ideal angle for the table is around 34 to 35 degrees.
Crown angle: This refers to the angle between the girdle and the bezel facets. The ideal range for the crown angle is between 33.5 and 35.5 degrees.
Bezel facets: These are the upper facets on the crown. There are typically eight of them, and they should be symmetrical and aligned with the table. The ideal angle for the bezel facets is around 40 to 41 degrees.
Star facets: which are located between the table and the bezel facets. There are typically eight star facets, and they should be symmetrical and aligned with the table. The ideal angle for the star facets is around 32.5 to 35 degrees.
Girdle: This is the widest part of the diamond and separates the crown from the pavilion.
Pavilion:
Main facets: These are the large facets located at the bottom of the diamond. There are typically eight of them, and they should be symmetrical and aligned with the girdle. The ideal angle for the main facets is around 40.6 to 41 degrees.
Lower girdle facets: These are the smaller facets located between the main facets and the culet. There are typically 16 of them, and they should be symmetrical and aligned with the girdle. The ideal angle for the lower girdle facets is around 41.2 to 42 degrees.
Culet: This is the small facet at the bottom of the diamond. It should be flat and centred. The ideal size for the culet is around 0.5% to 1% of the diameter of the diamond.
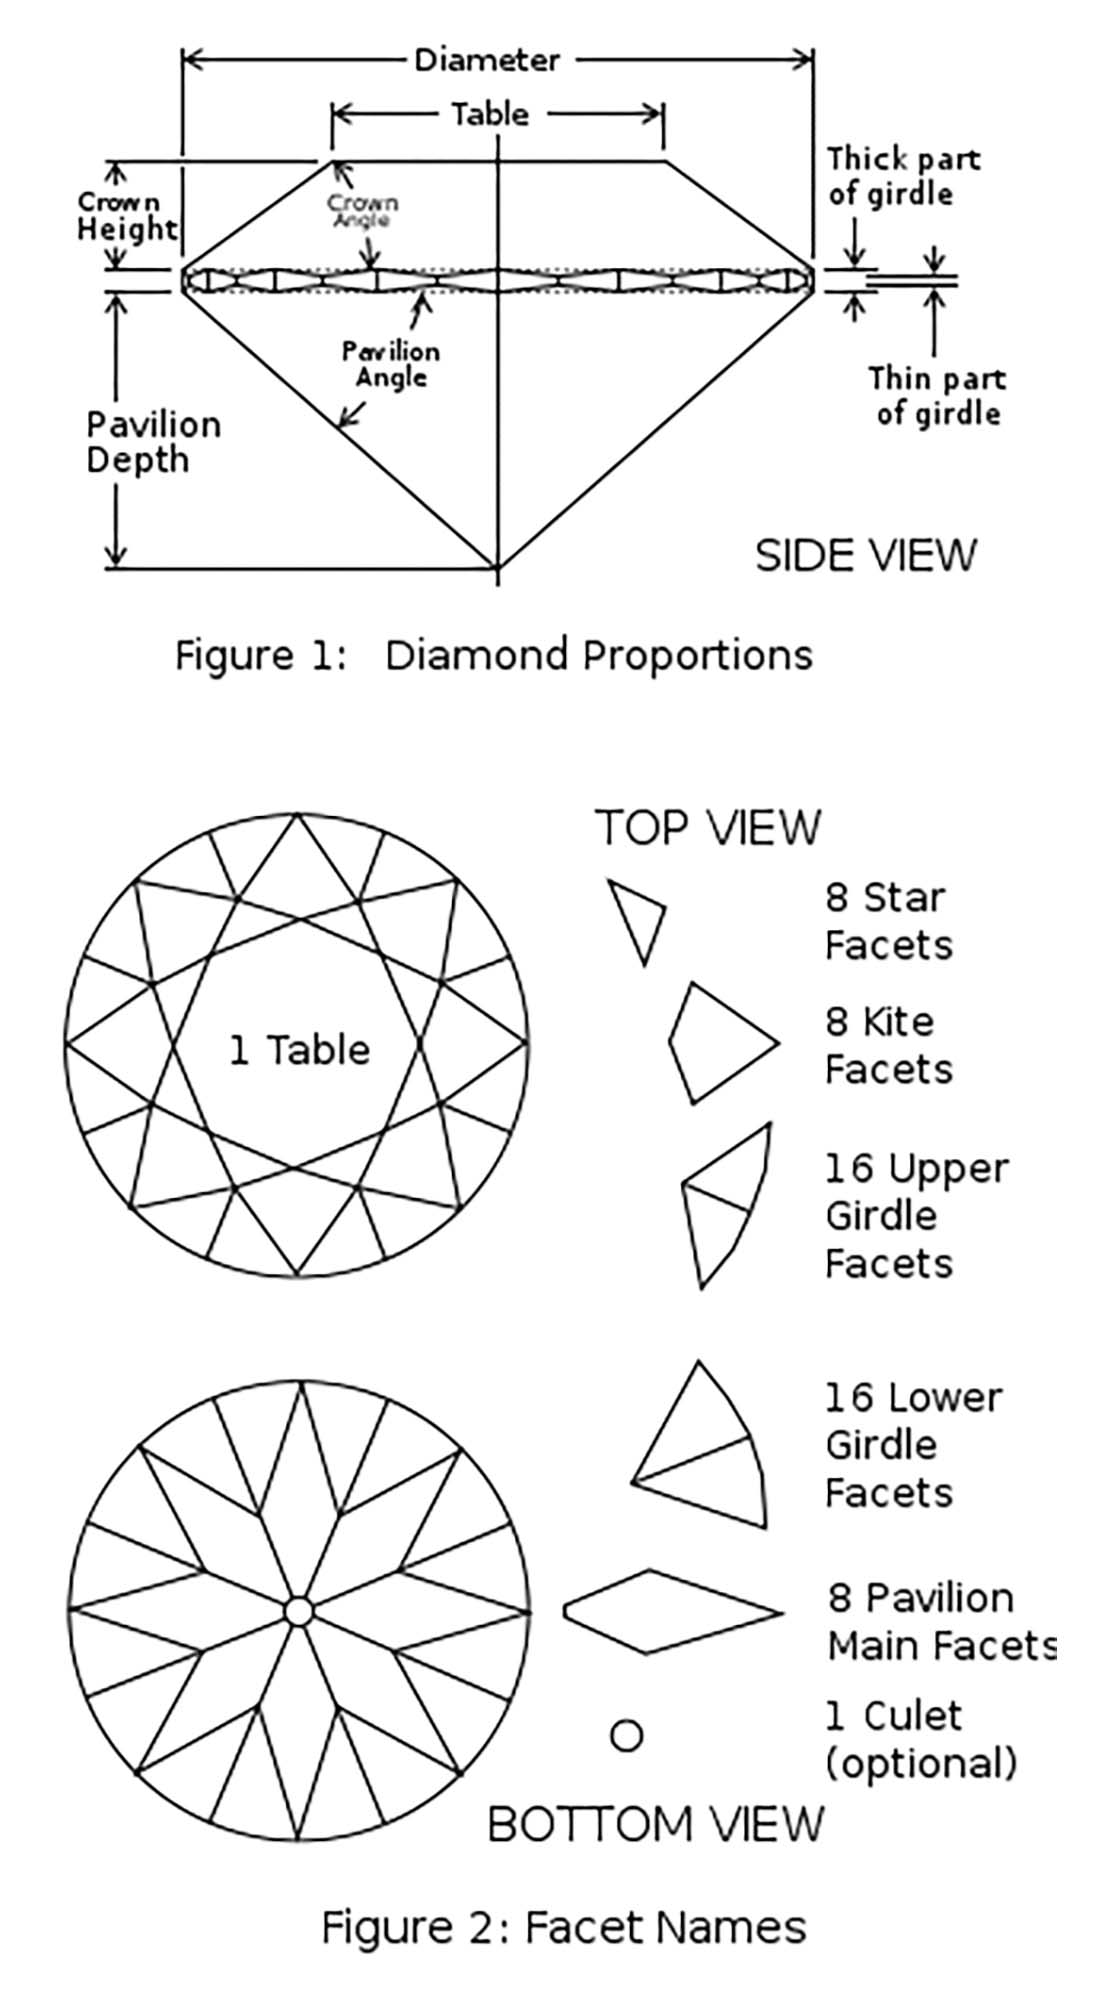
These angles are crucial for creating the diamond's sparkle and brilliance. If the angles are too shallow or too deep, light will not reflect and refract properly, resulting in a dull-looking diamond. Therefore, it's important to keep these angles in mind when drawing a diamond to ensure that it looks accurate and stunning.
Diamond when seen with our naked eye sometime shows shiny light like a sparkle. what exactly makes diamonds sparkle? The answer lies in the Physics of light(optics). To be more precise 3 parts of the Physics of light namely Refraction, Reflection and Dispersion.
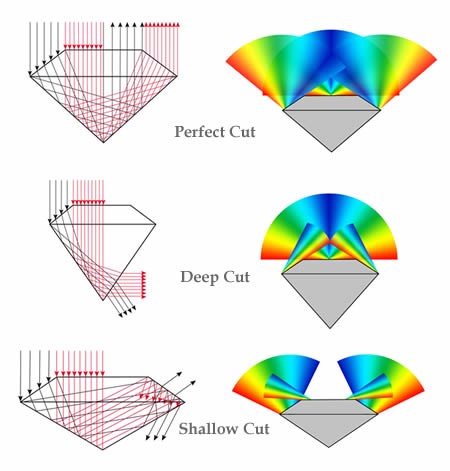
When light enters a diamond, it is refracted, or bent, and then reflected back out in a process called total internal reflection. This happens because diamonds have a high refractive index, which means that light travels more slowly through them than through other materials. As the light bounces around inside the diamond, it is also dispersed, or broken up into its component colors, which creates the famous rainbow effect known as dispersion.
Diamonds are, in essence, tiny, intricate prisms; light enters through the top and is slanted around the inside of the diamond before returning to the top and exiting through the surface. This adds to the brilliance and creates a rainbow look (dispersion).
However, not all diamonds are created equal when it comes to their ability to reflect light. The cut of a diamond is crucial in determining its brilliance and sparkle. A perfect-cut diamond will have the optimal proportions and symmetry to maximize the amount of light that enters and exits the stone, creating the desired effect. A poorly cut diamond, on the other hand, will leak light from the sides and bottom, reducing its Sparkle.
In addition to the cut, other factors such as the size and number of facets on a diamond, as well as its clarity and color, can also affect its ability to reflect light. A larger diamond with more facets will generally have more sparkle than a smaller one with fewer facets. Diamonds with fewer inclusions, or imperfections, will also have better light reflection since there are fewer obstacles for the light to pass through.
In conclusion, the physics behind the sparkle of diamonds is a combination of their high refractive index, total internal reflection, and dispersion of light. The cut, size, number of facets, clarity, and color of a diamond all play a role in its ability to reflect light and create the desired sparkle. Whether you're looking for a diamond engagement ring or a pair of diamond earrings, understanding the science behind the sparkle can help you make an informed decision when selecting your jewelry.
The step-by-step process for drawing a perfect round diamond and also understanding the science behind all the angles required to draw.

Draw a straight line, using a ruler. My line's length is 10 cm—knowing the exact value is beneficial for the next steps because we will be making some measurements.
Please be sure to leave enough space for the lower part of the diamond.

I add another straight line (the distance between the lines is 3mm) and connect them. Now we have a narrow, elongated rectangle—it's the draft shape for the diamond's girdle.
Using 3 mm is because usually the highest part of the gridle is in the range of 1.1% to 3.9% so we are using 3% (mean of the range) of 10 cm is 3mm(0.3cm).
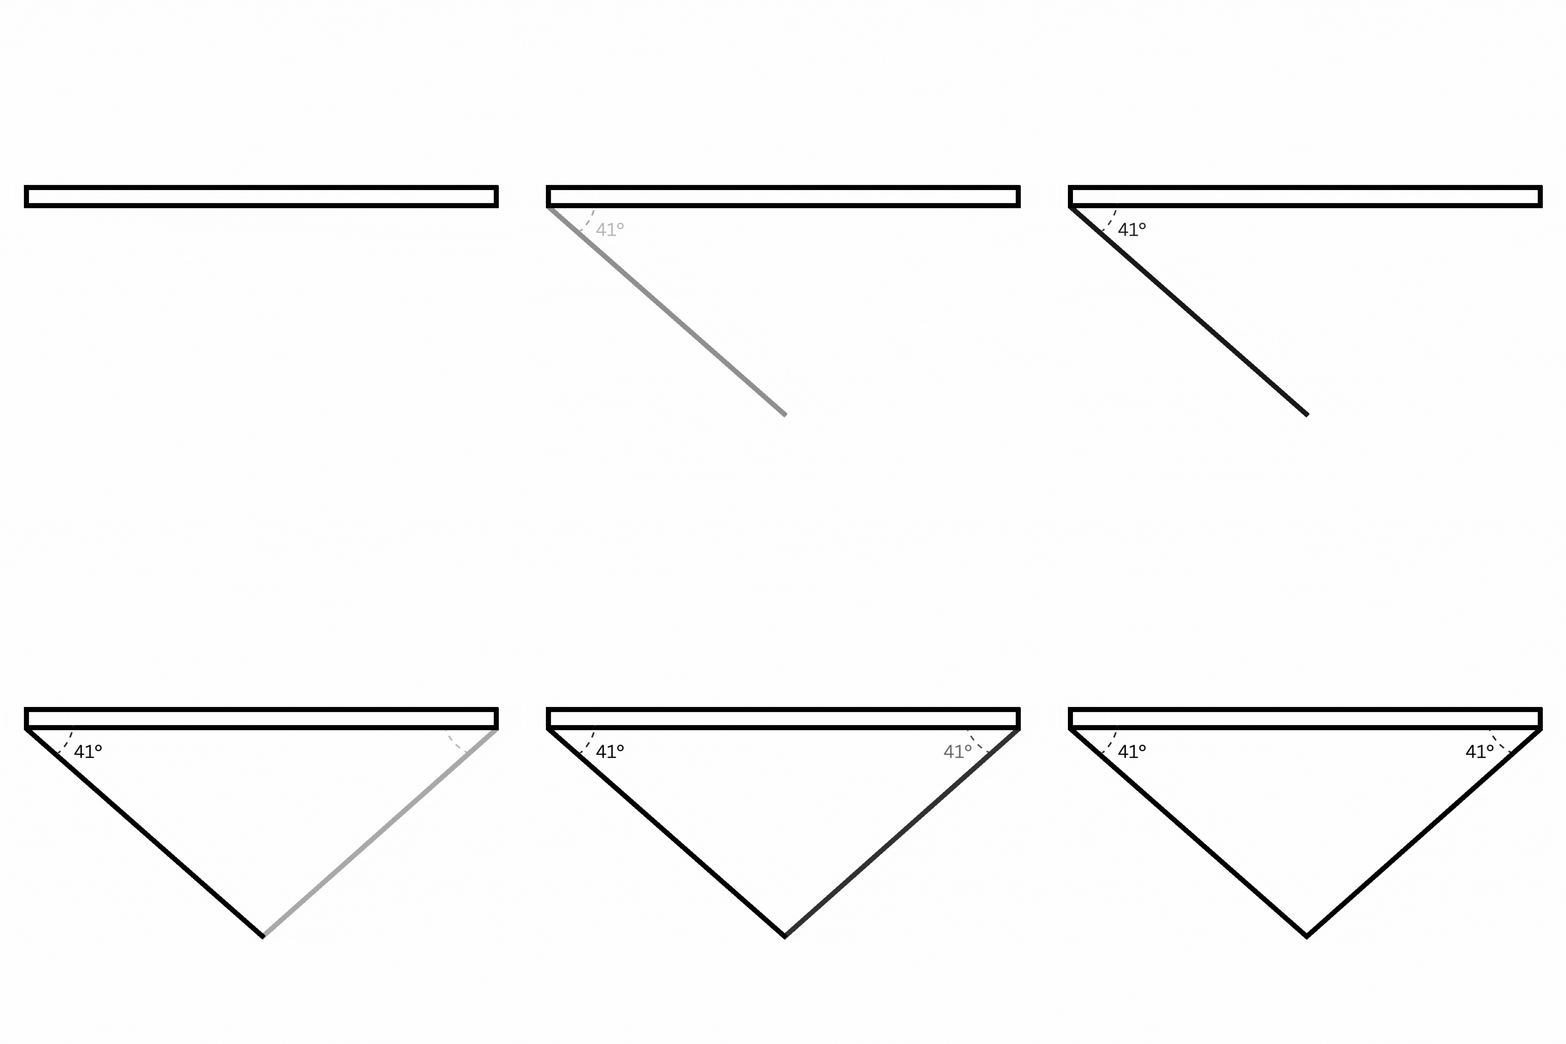
As we know that a pavilion angle is in range of 40.2° to 41.25° we can take 41° as an angle. With a protractor, I find the 41°angle and draw two lines. They will intersect at some point and create a basic shape of the diamond's pavilion.
The value of 41° is considered in range with ideal pavilion angles, it gives the best light performance, but there are many examples that don't conform to the standard (deep or shallow variants).
Deep Means When a diamond's total depth is too high relative to the average girdle diameter. This results in the light not reflecting properly, and the diamond looks less lively, having lower brightness compared to more proportional ones.
Shallow is exactly opposite of Deep Diamond. Diamonds that are cut with high width and low depth are called Shallow-cut diamonds. This results in light is not reflected back to the table of the diamond and exits from the bottom part, which makes the diamond lose its brilliance and beauty.
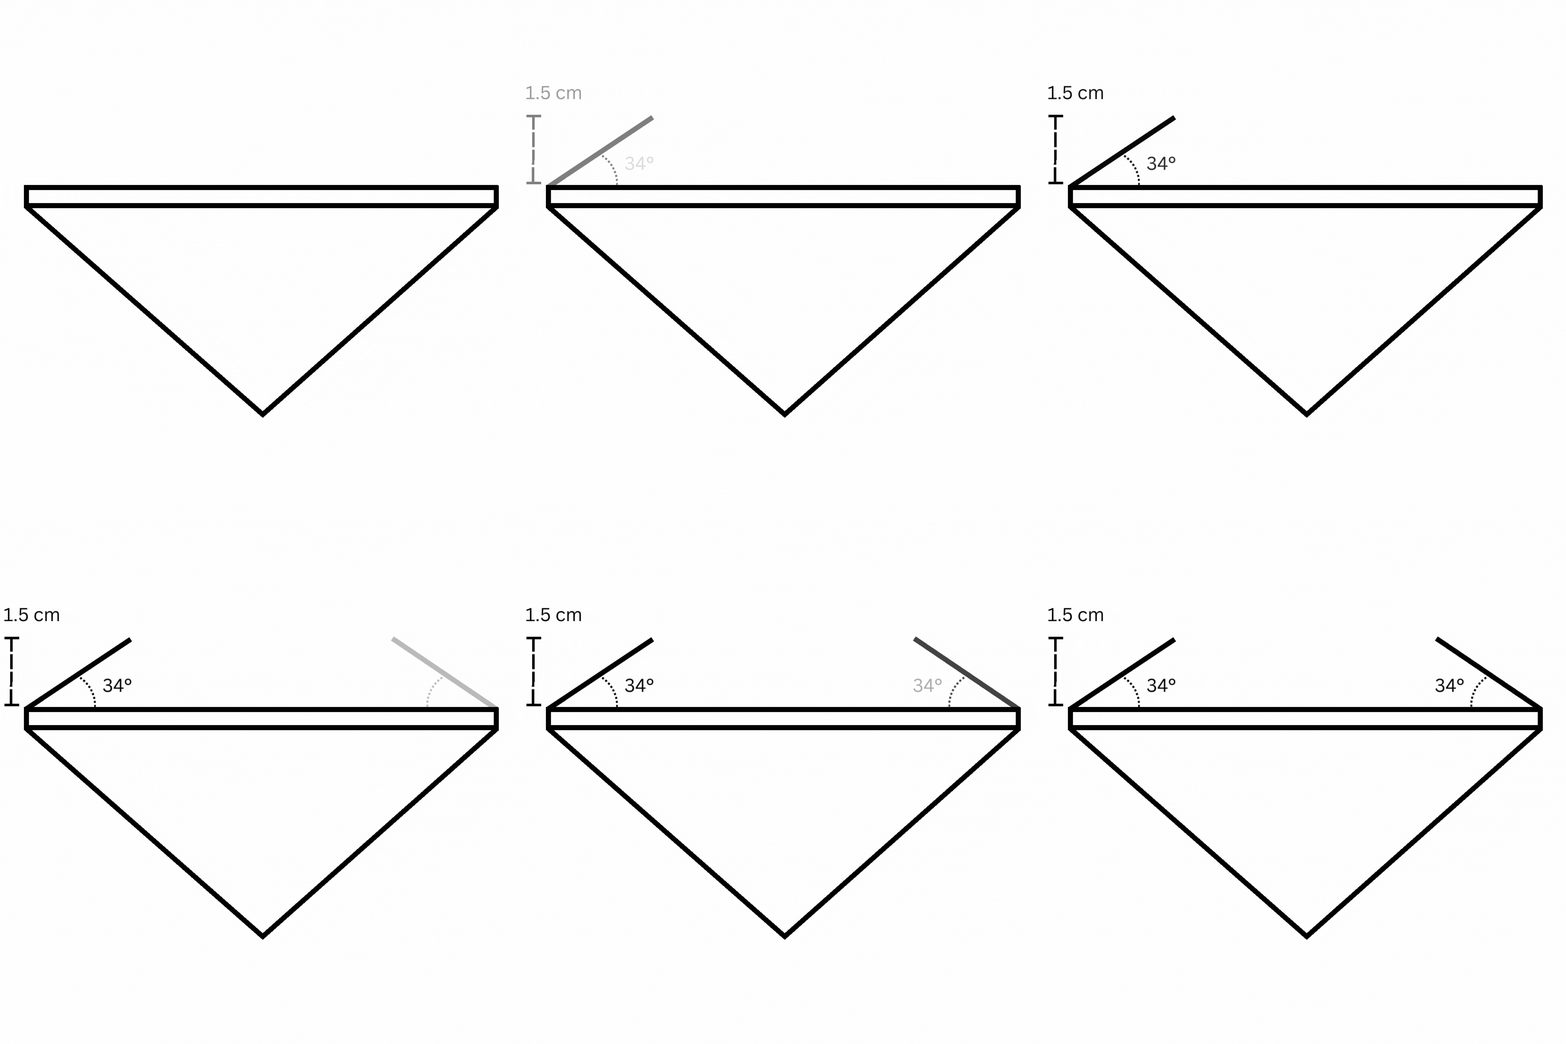
It's time to construct the diamond's upper part, the crown. As we know that a pavilion angle is in range of 33.7° to 35.8°, we can take 34° as an angle. I find the angles of 34° (again, this value may be different) and draw two diagonal lines of 1.5 cm each (15% of gridle length).
The crown height of the diamond is usually in 14% - 16% of the total width (diameter) of the diamond. So, we have 15% of gridle length which is 10 cm, hence 1.5cm.
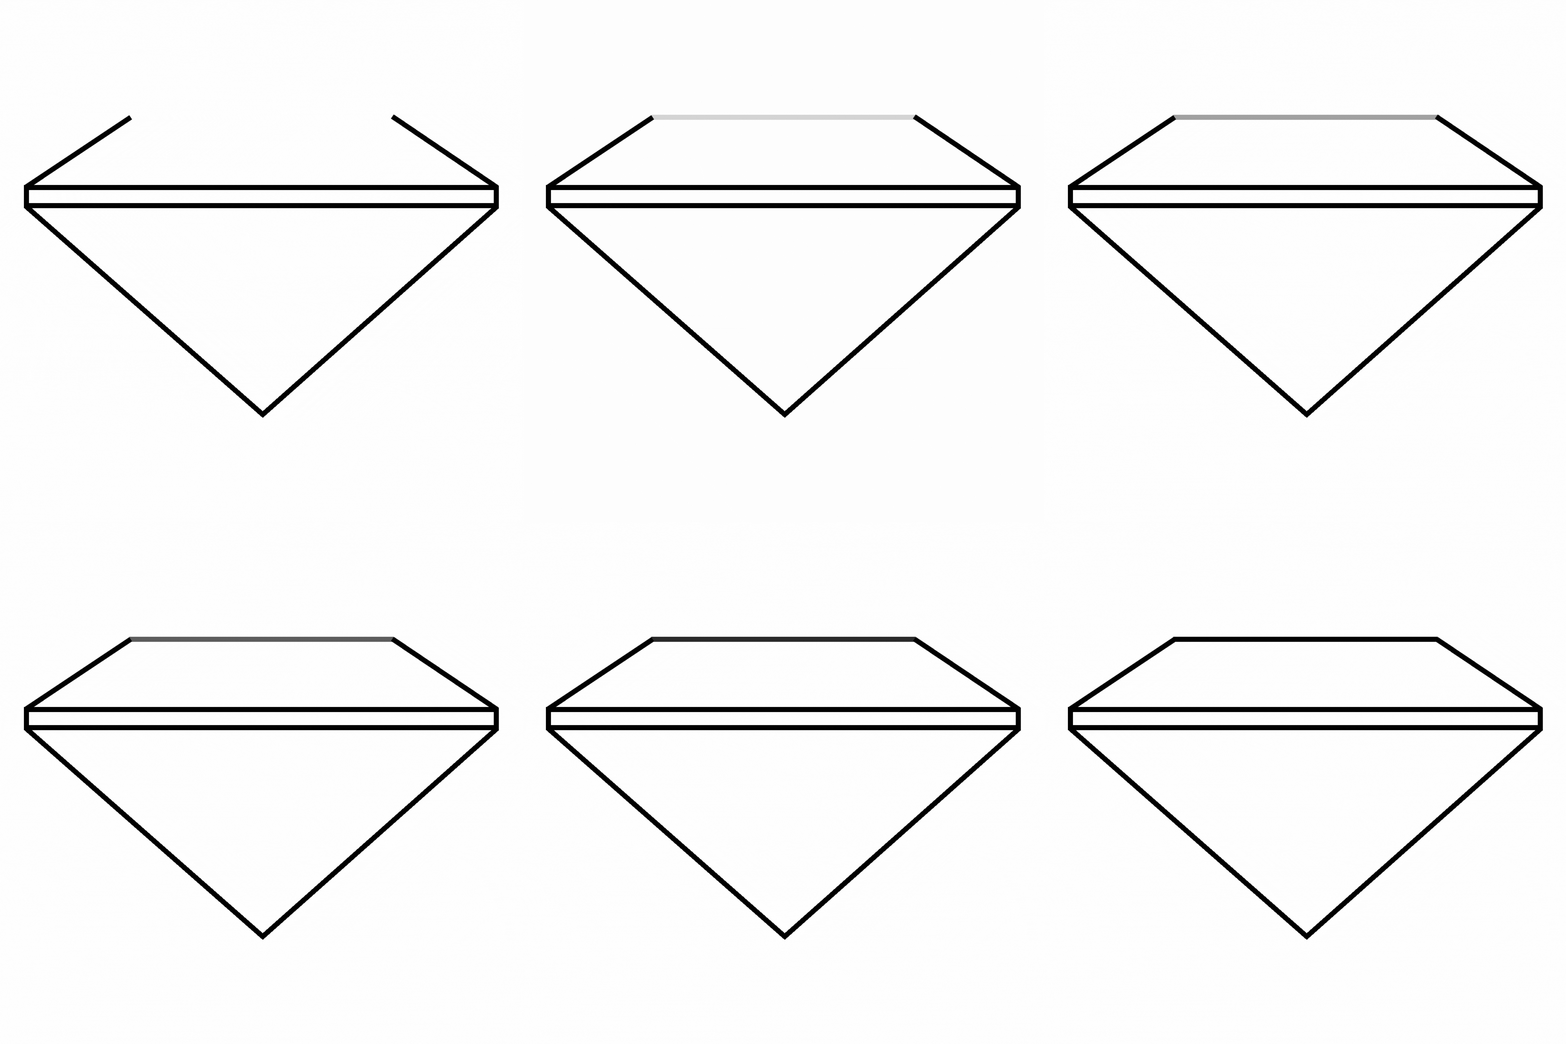
I add a straight line to create the table of the diamond. With this are table is completed
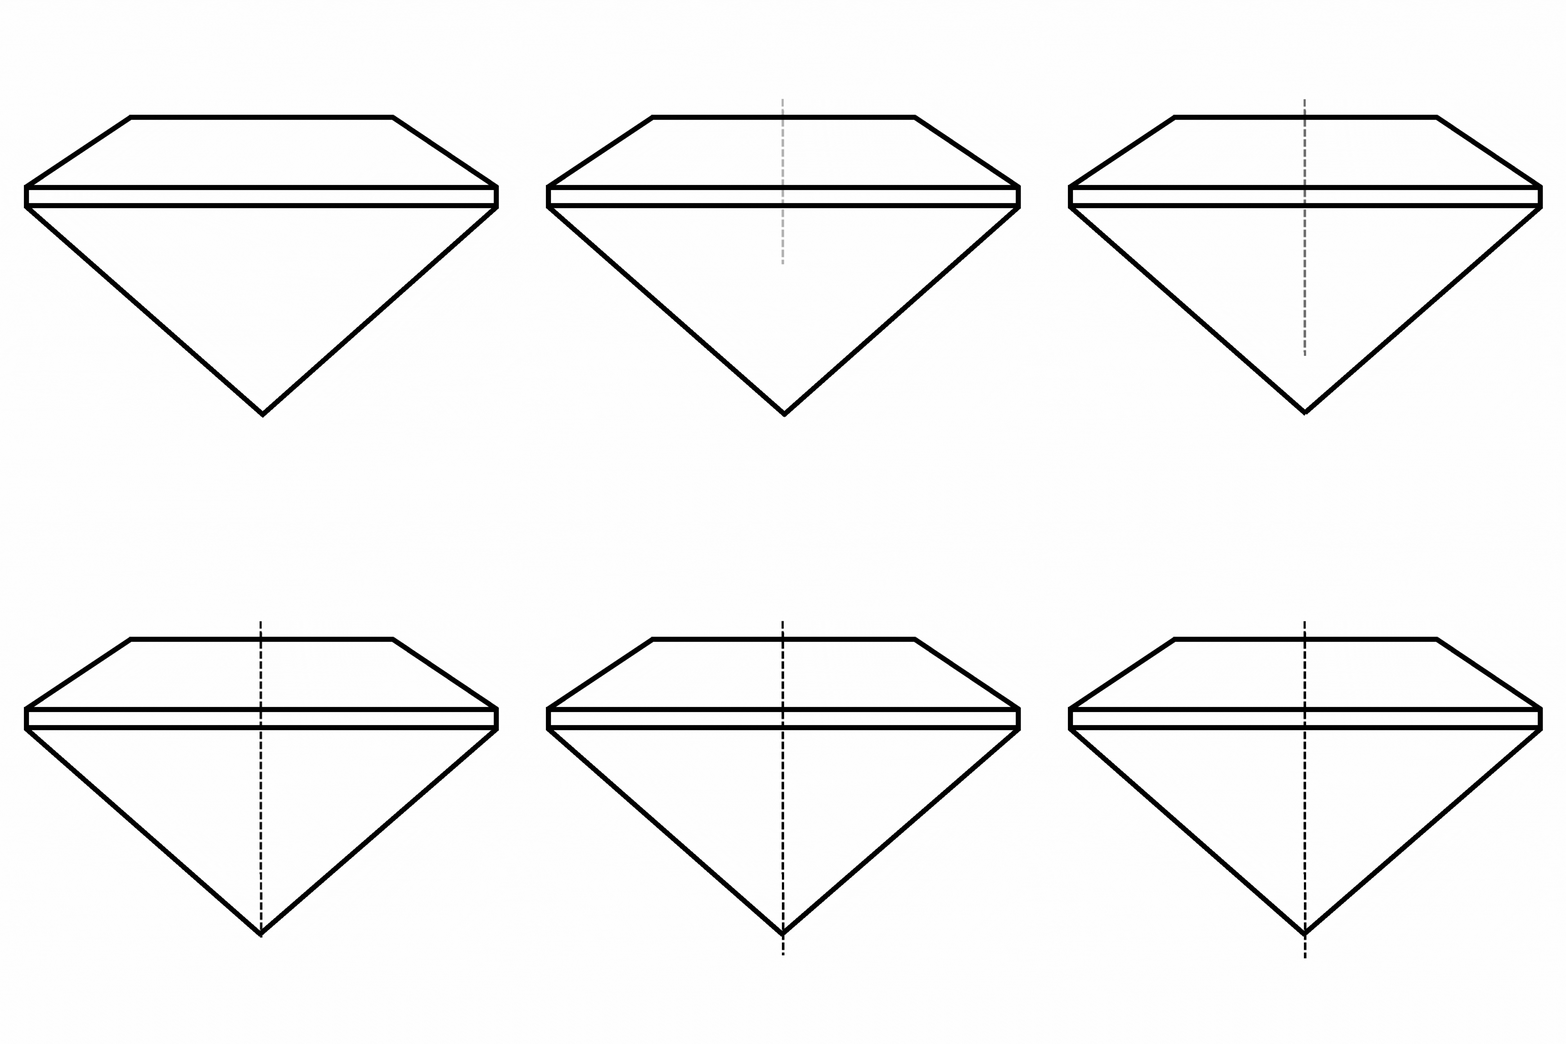
I draw a dashed line that divides the diamond in half. This will be our reference line to make sure that everything in the drawing is symmetrical.
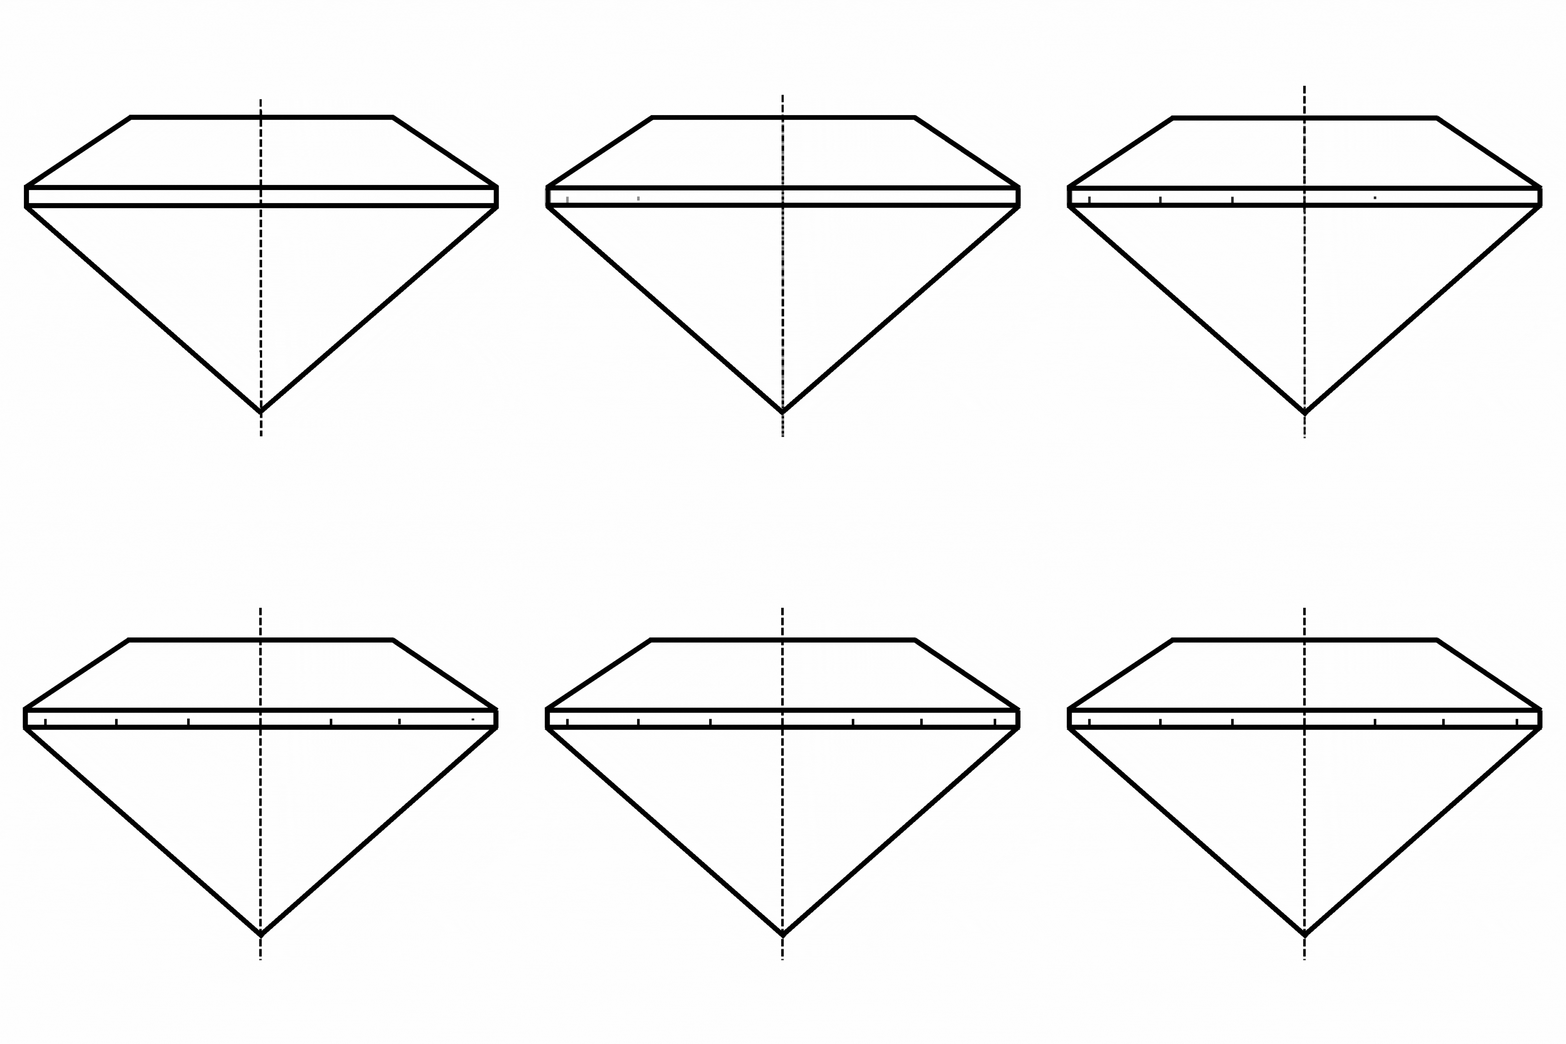
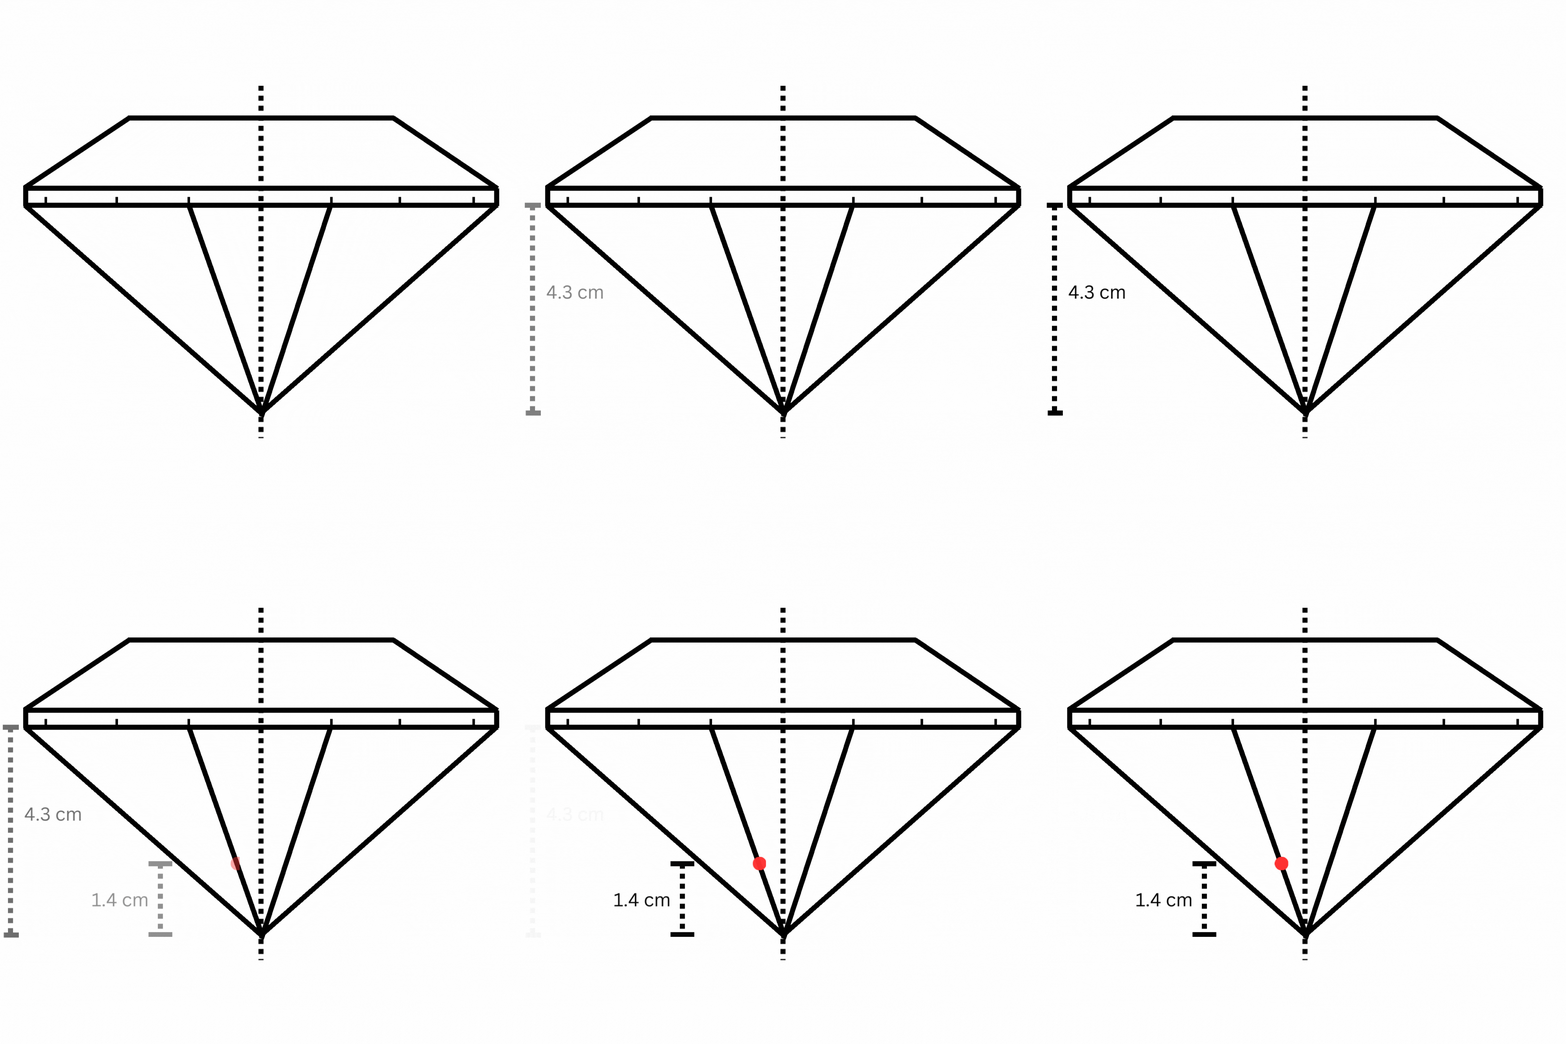
I create the subsegments inside the OA segment. The first three parts have a length of approximately 1.6 cm, and the fourth part is very short.
I also give the names A, O, and B to the points of the shape to make the demonstrations easier.


Let's agree that the starting point of the first subsegment of the girdle is the point C.
I connect the points B and C.
Then I join the points on the opposite side of the shape, as if I'm mirroring the design.
I divide the CB segment into three approximately equal parts and mark the lower one with the point D.
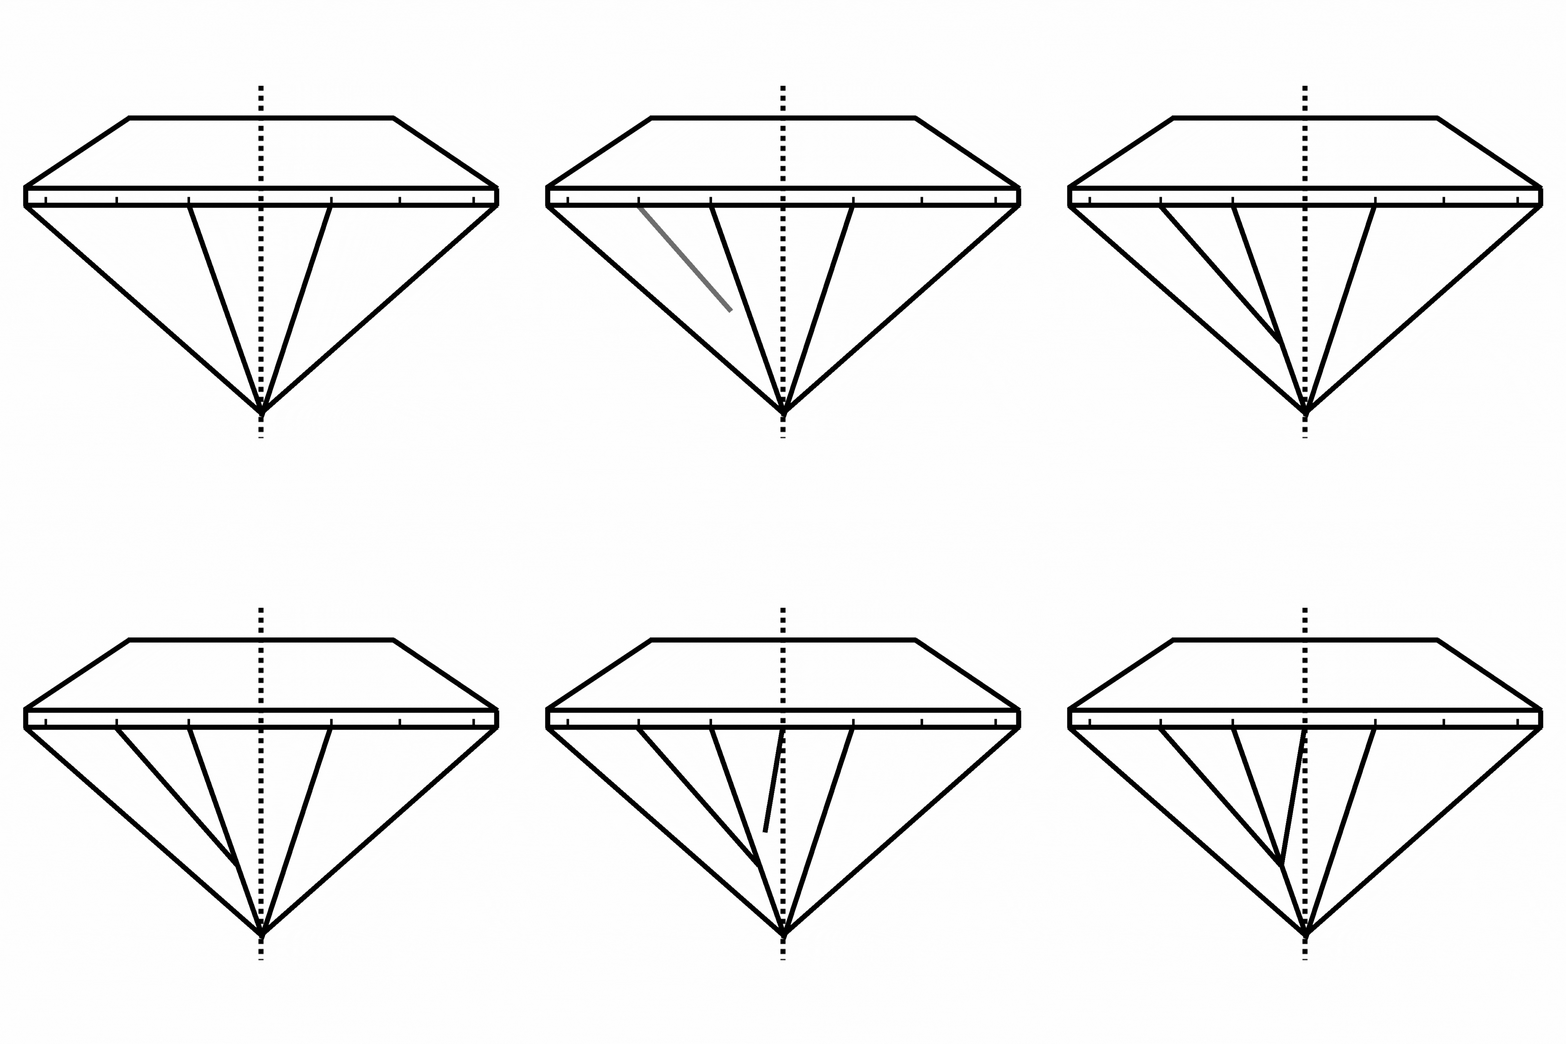
I connect the points D and O. Then I join the point D with another point on the left side (it's the point E in the illustration below).
I reproduce this set of lines on the opposite side of the shape.
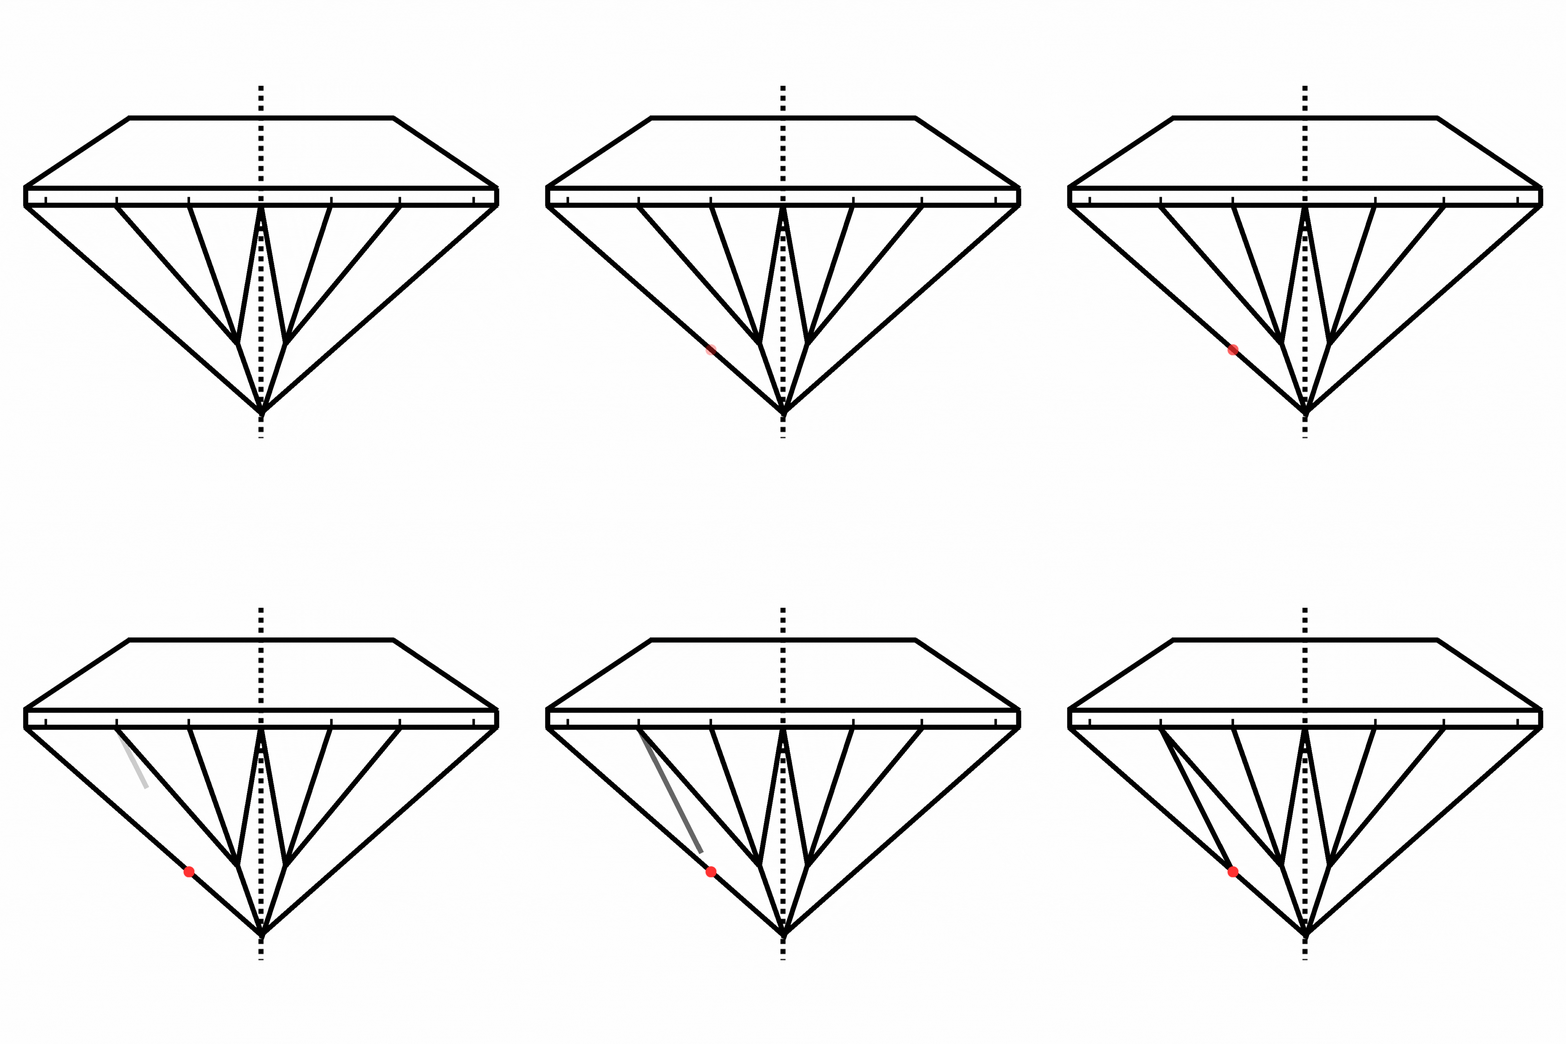
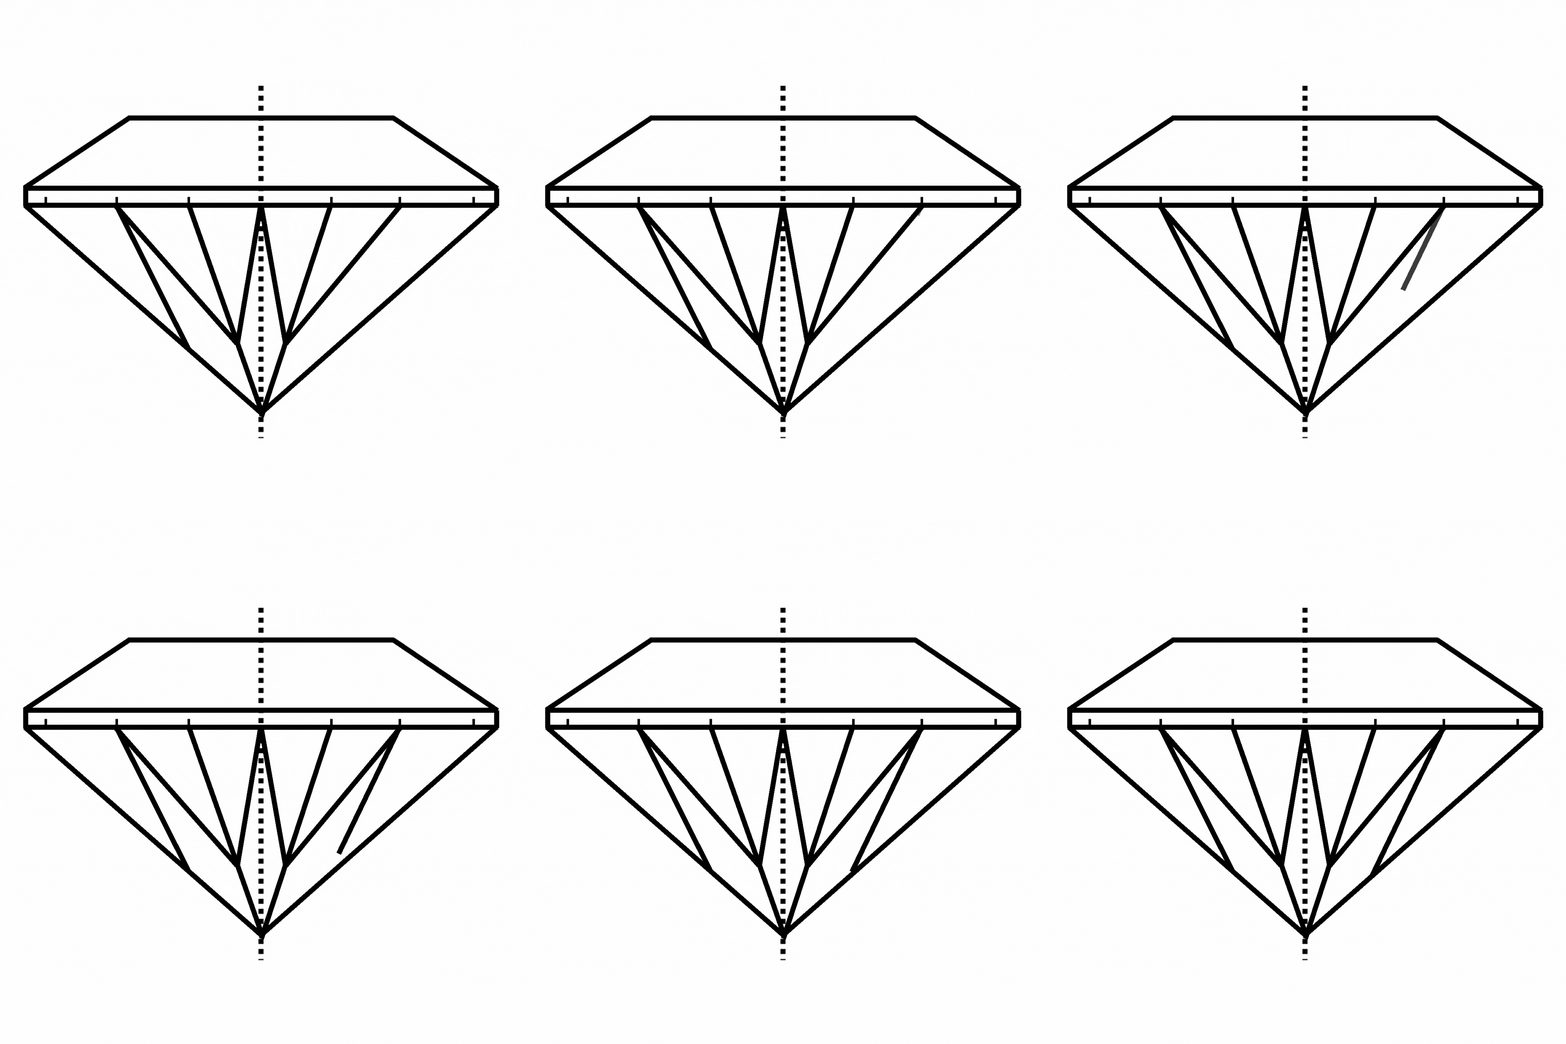
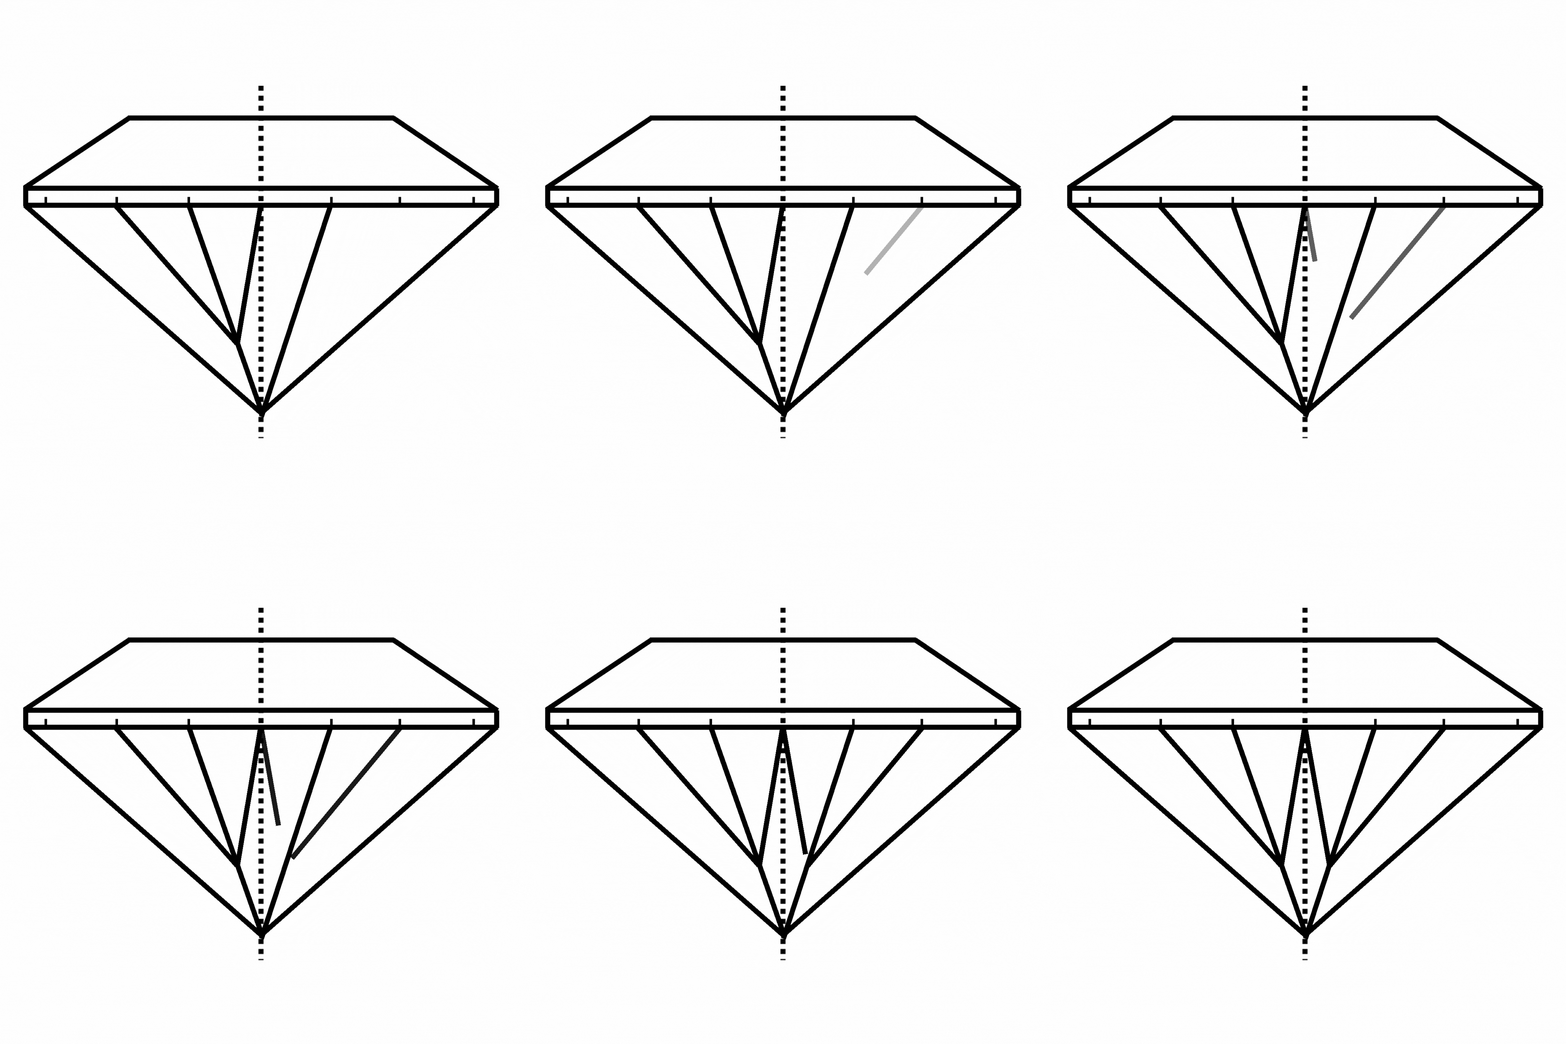
I add the point F; it should be on the same imaginary line as the point D or slightly lower than it. Then I connect the points E and F.
Diamond is a 3d object and not 2d so when nearing the edges of 2d design of a 3d object we can either slight increase or decrease the length of the points.
I reproduce this design on the right side of the shape.
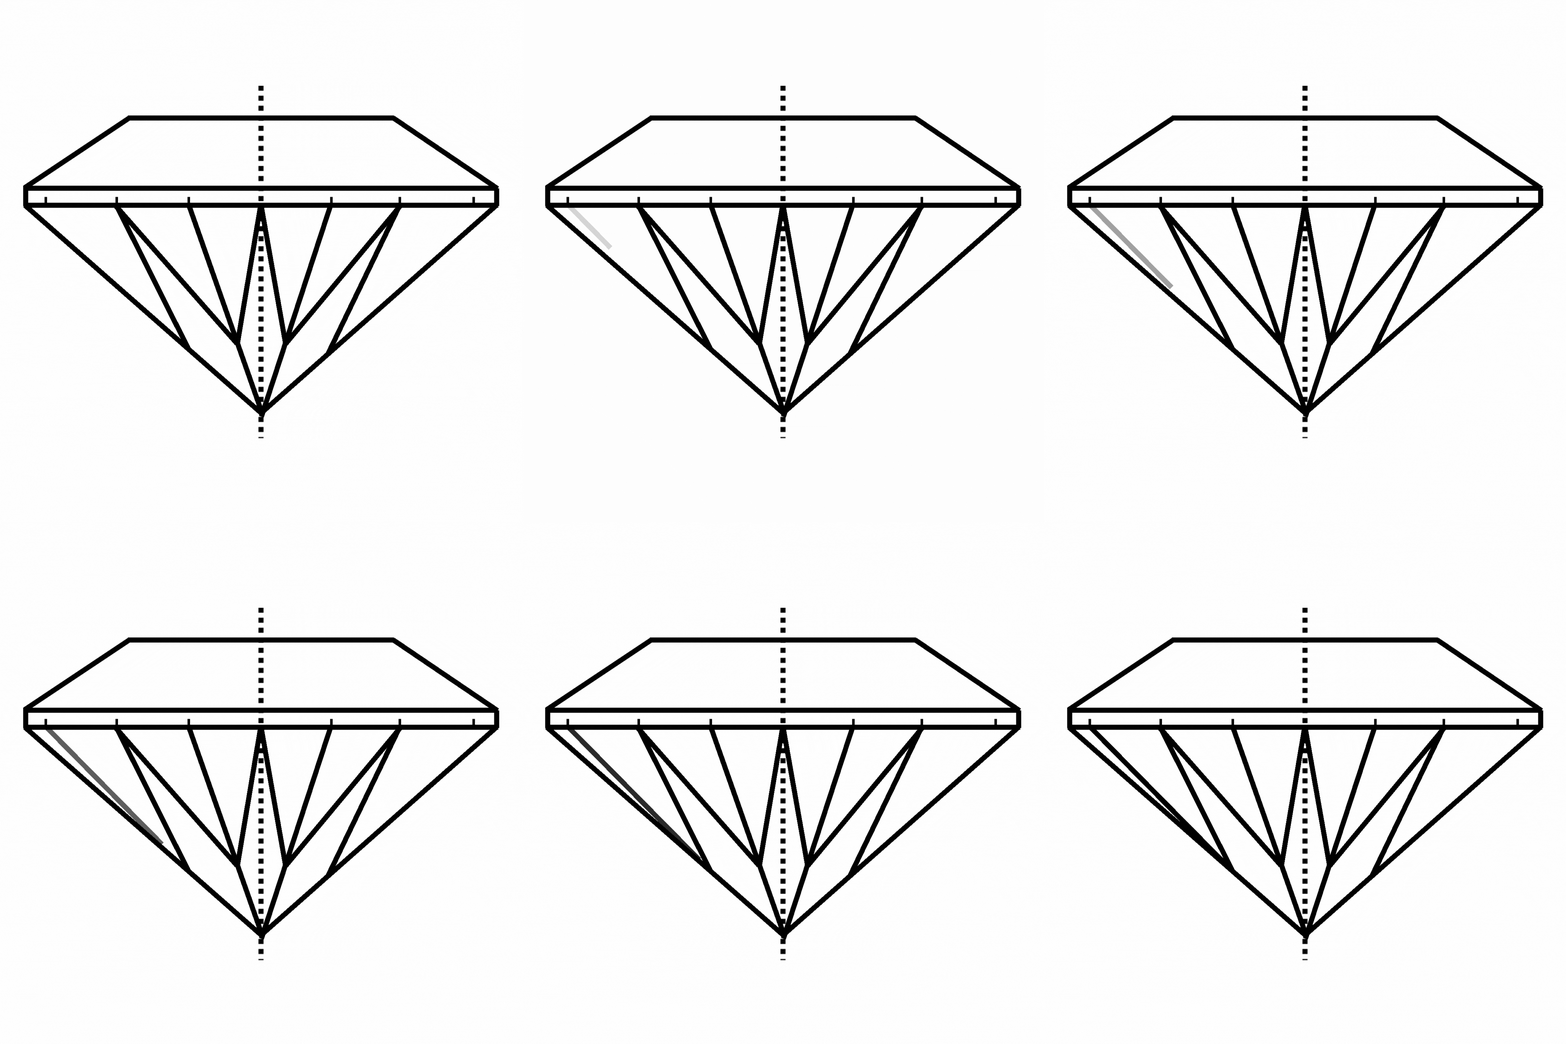
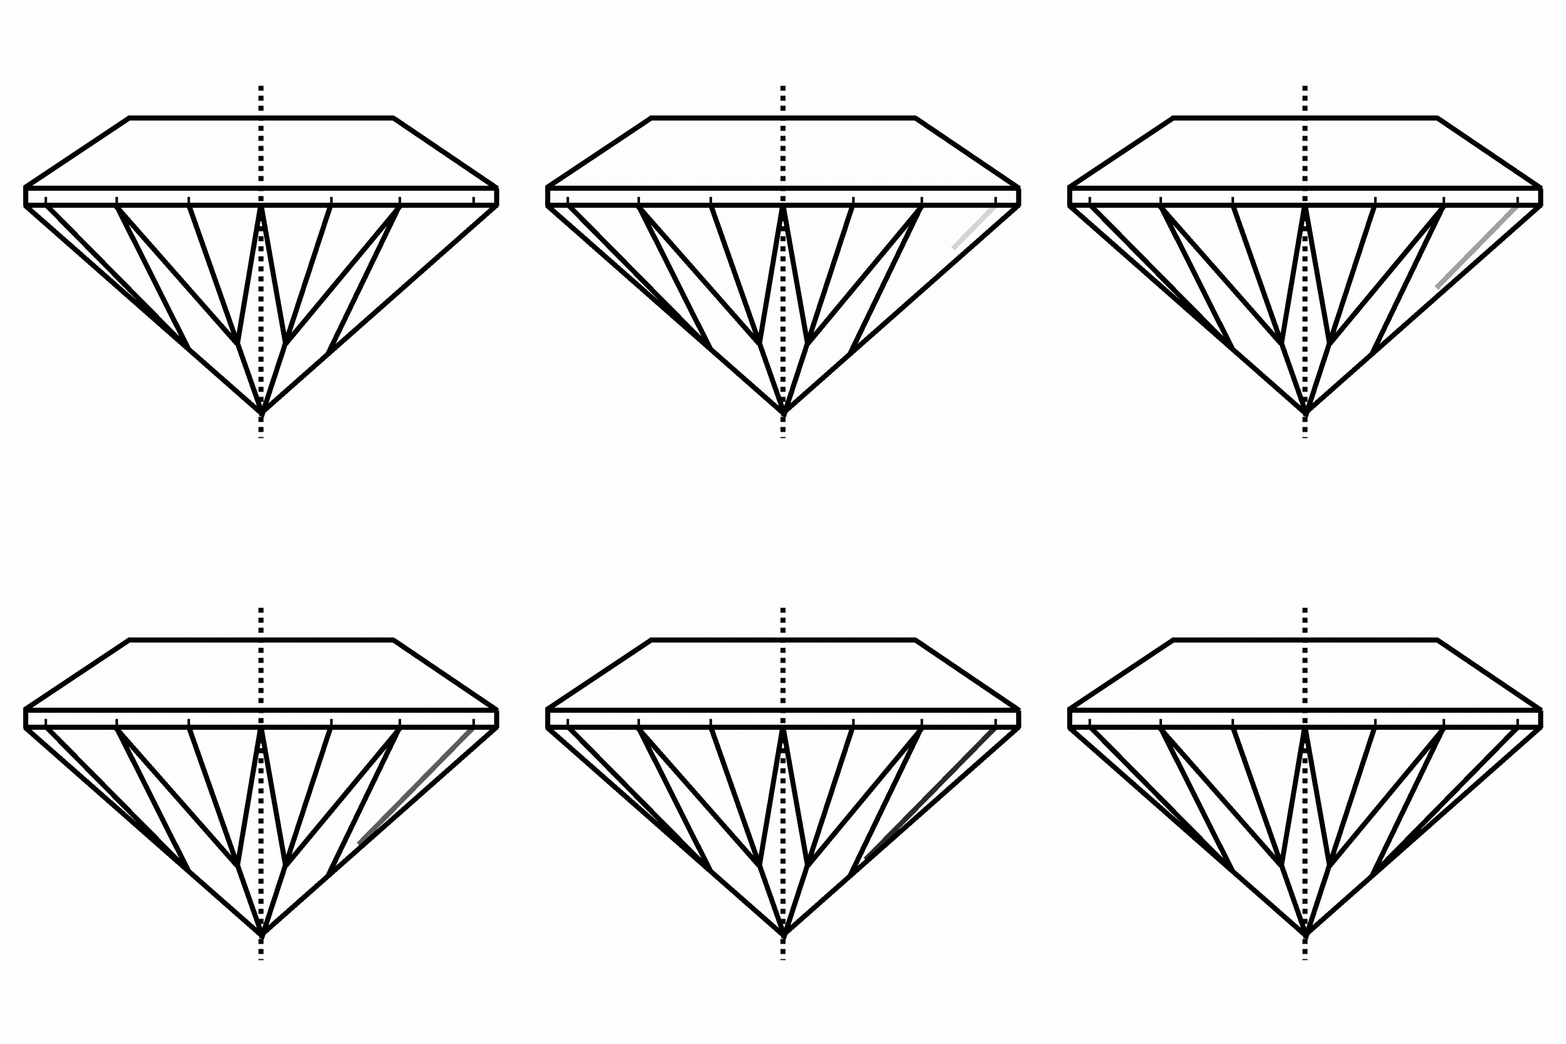
Let's agree that the point marking the shortest part of the girdle is called the point G. I connect the points G and F.
I repeat the same action on the right side of the shape.
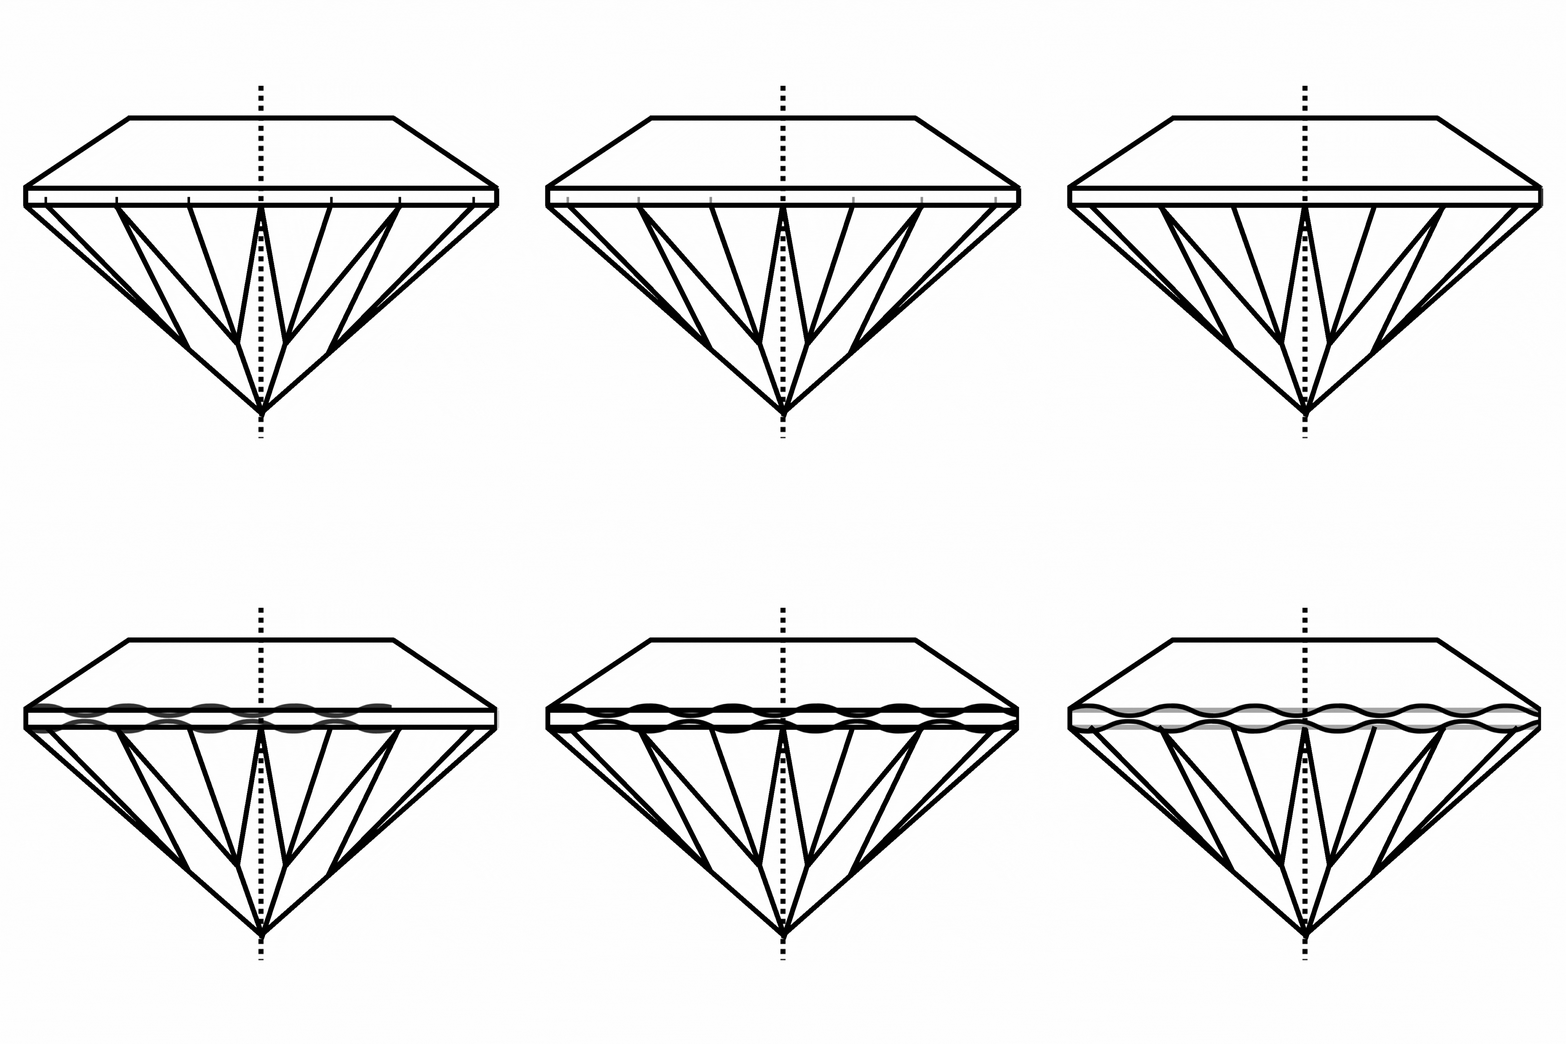
I draw a distinctive pattern that consists of wider and thinner parts. Actually, there is no strict rule for how a diamond girdle should look, so you can be as creative as you wish.
I complete the girdle.
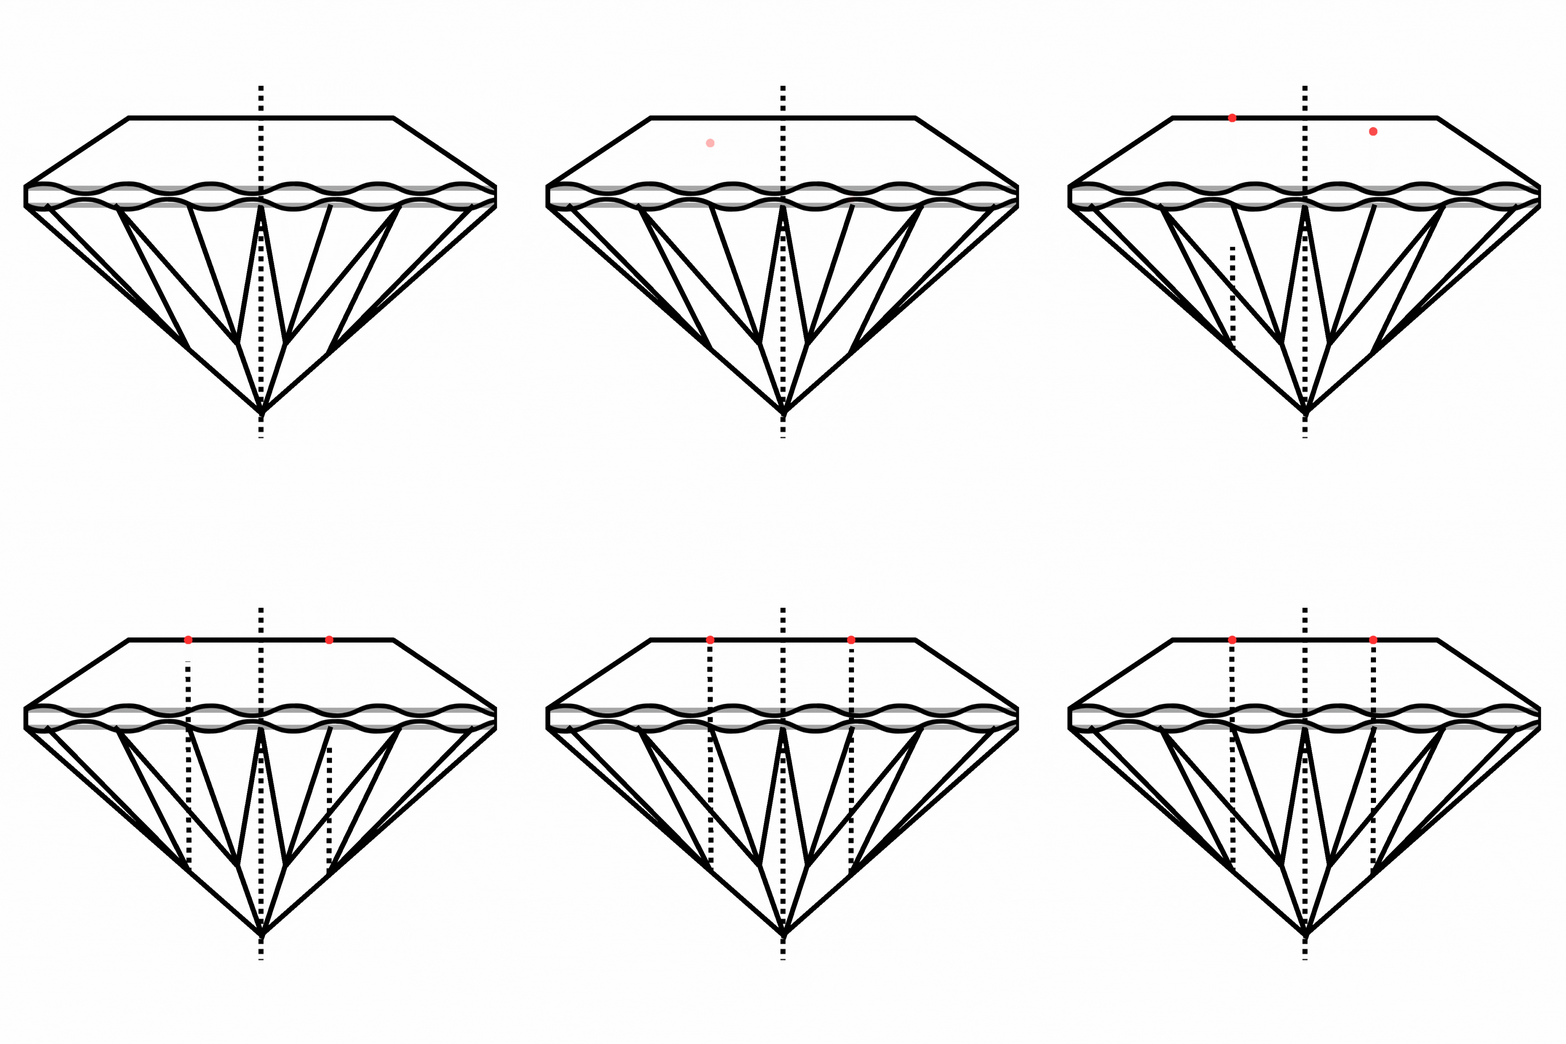
I draw a vertical dashed line from the point F and mark the point of intersection with the upper line with the letter H.
Then I add another line, going from the corresponding point on the right side; now we get the point H₁.
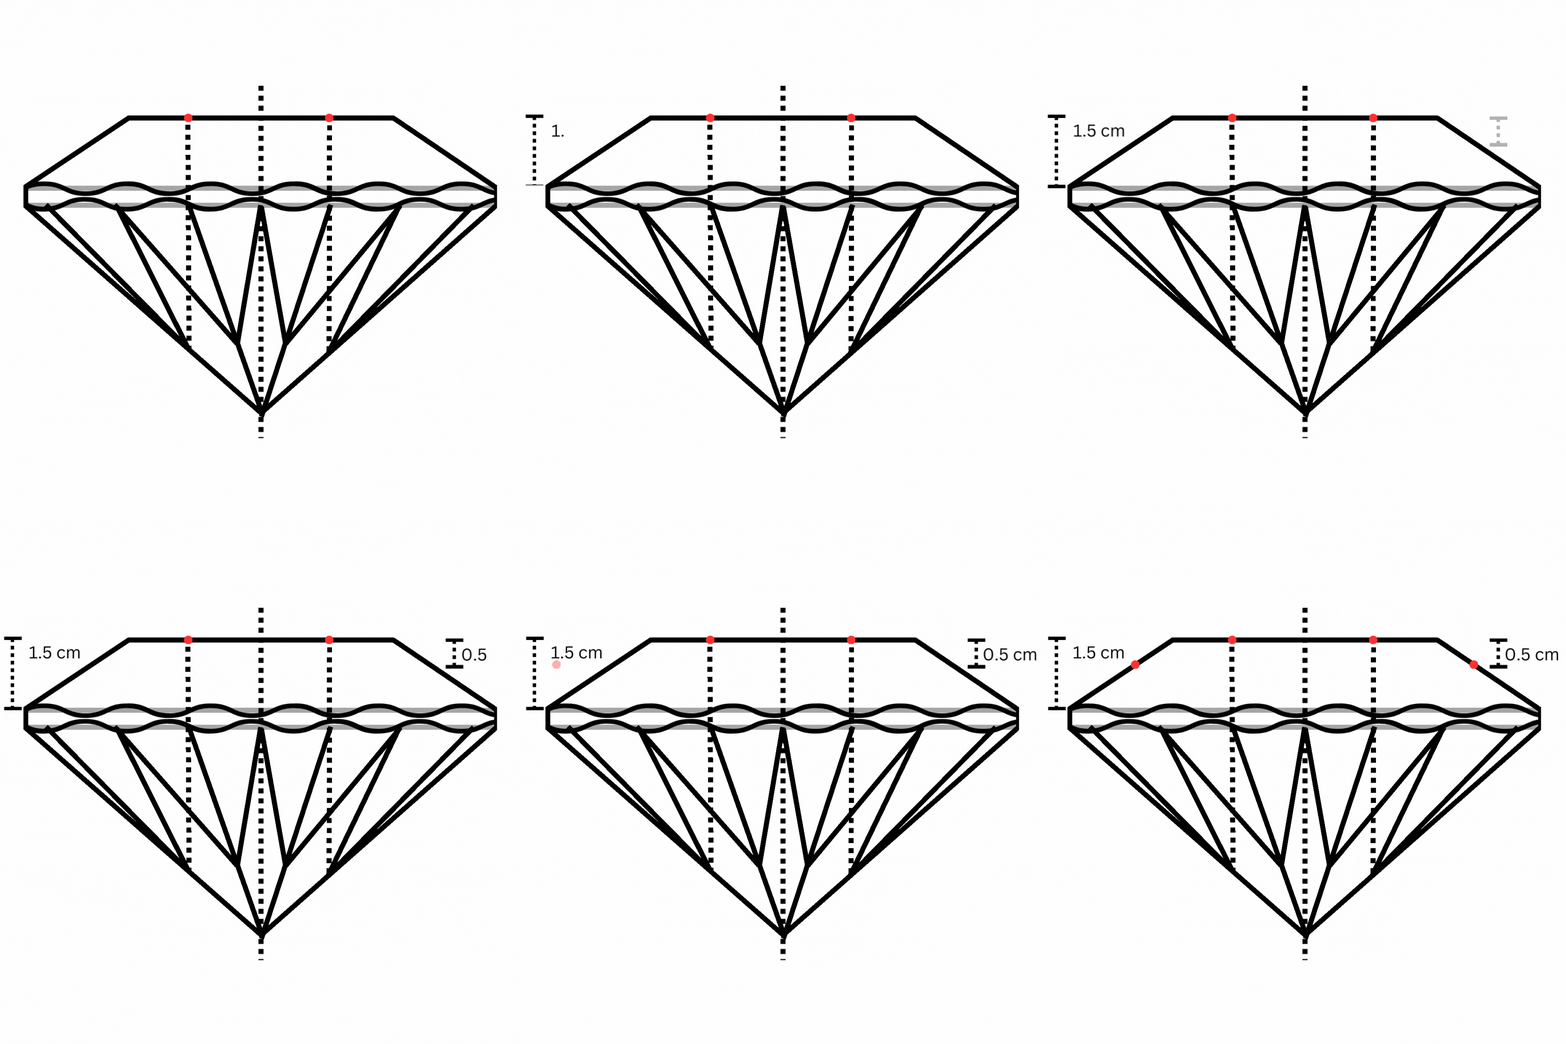
I divide the side border line of the crown into three parts. The upper segment is marked with the letter I.
I add a corresponding point on the opposite side of the diamond.
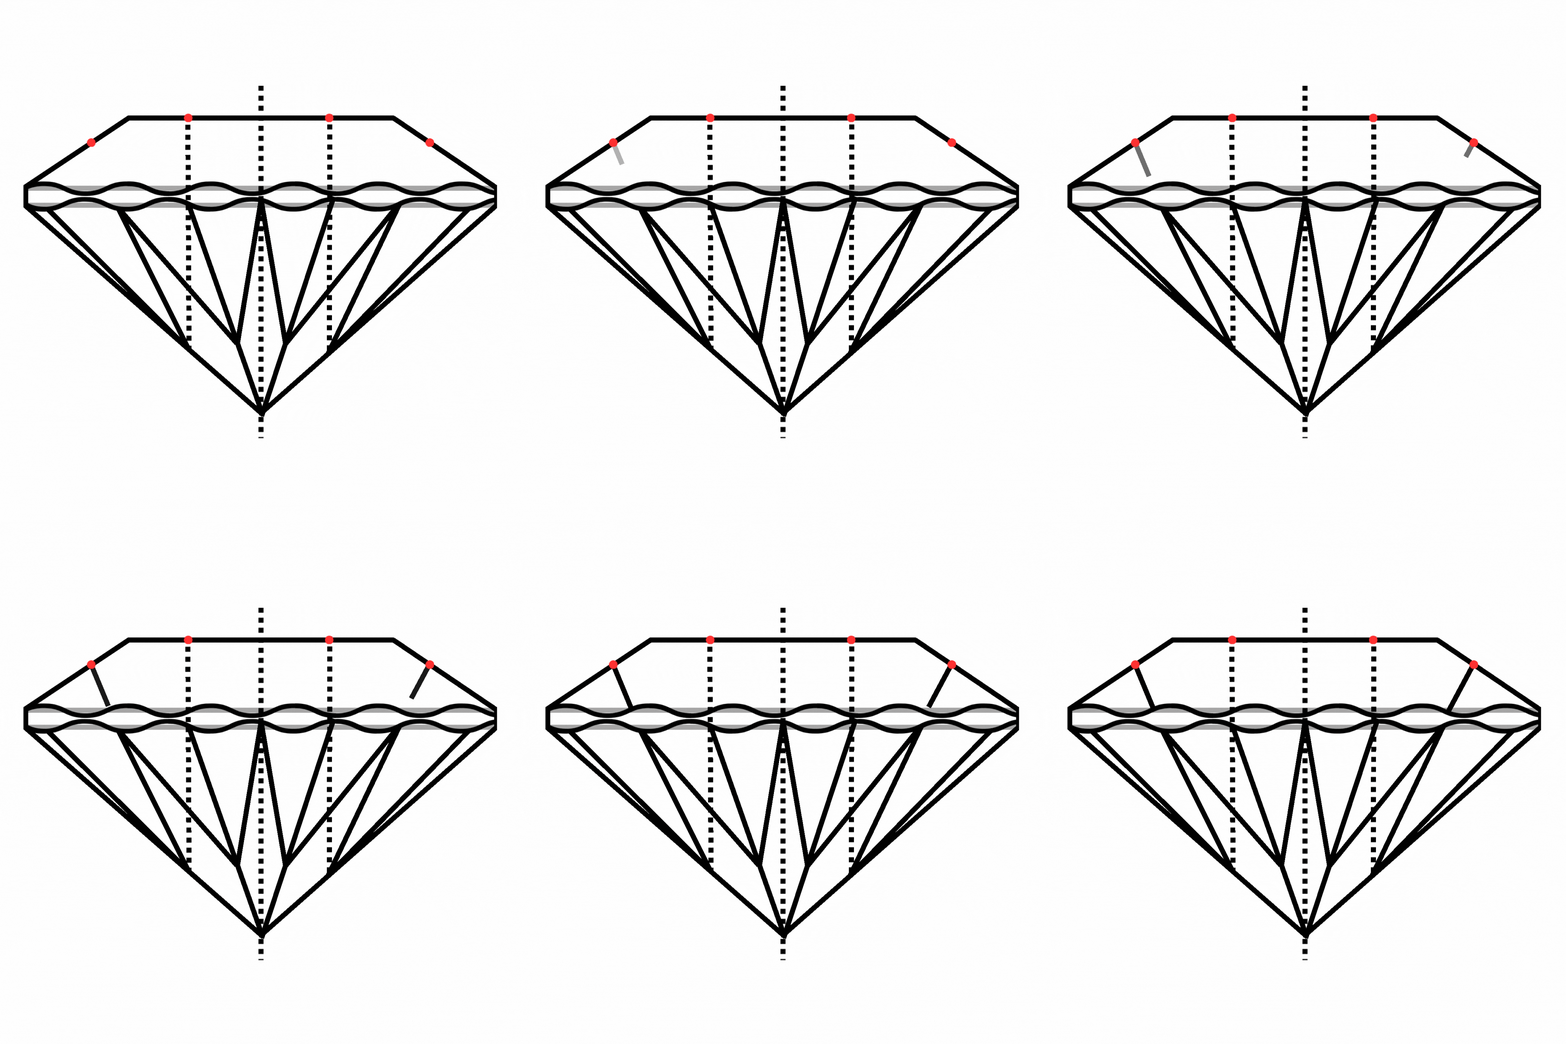
I add a line going from the point I to the prominence above the point E.
Then I reflect this line to the opposite side of the drawing.
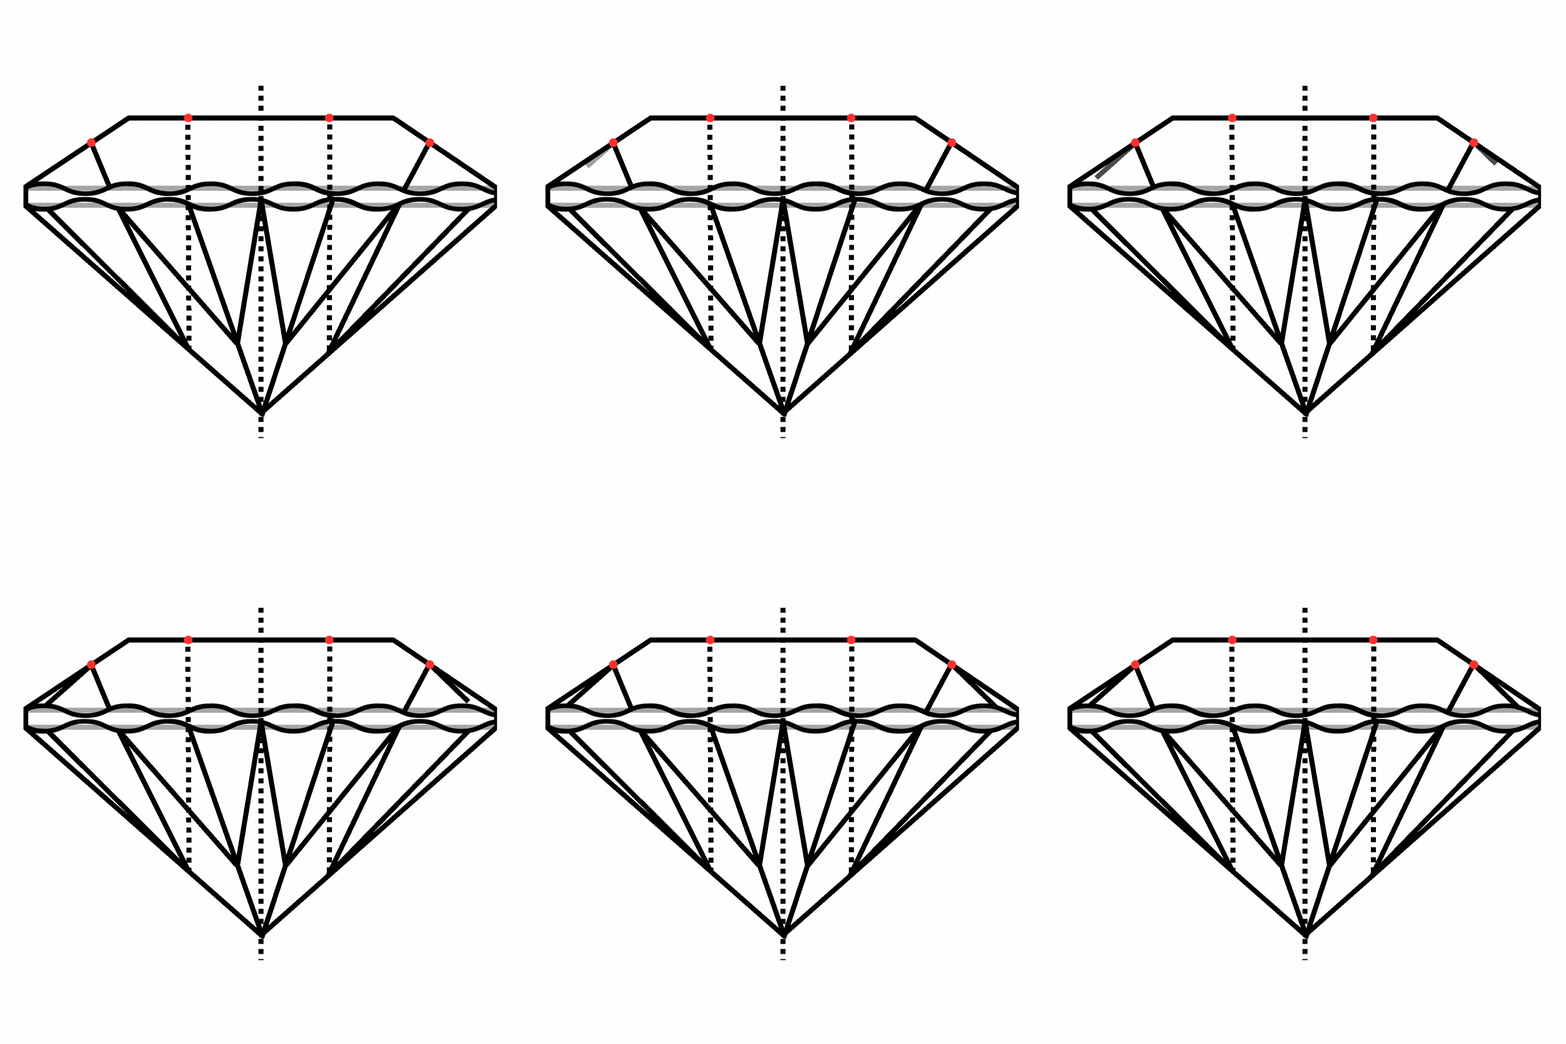
I add a line going from the point I to the prominence above the point G. Then, as usual, I repeat the pattern on the right side of the shape.
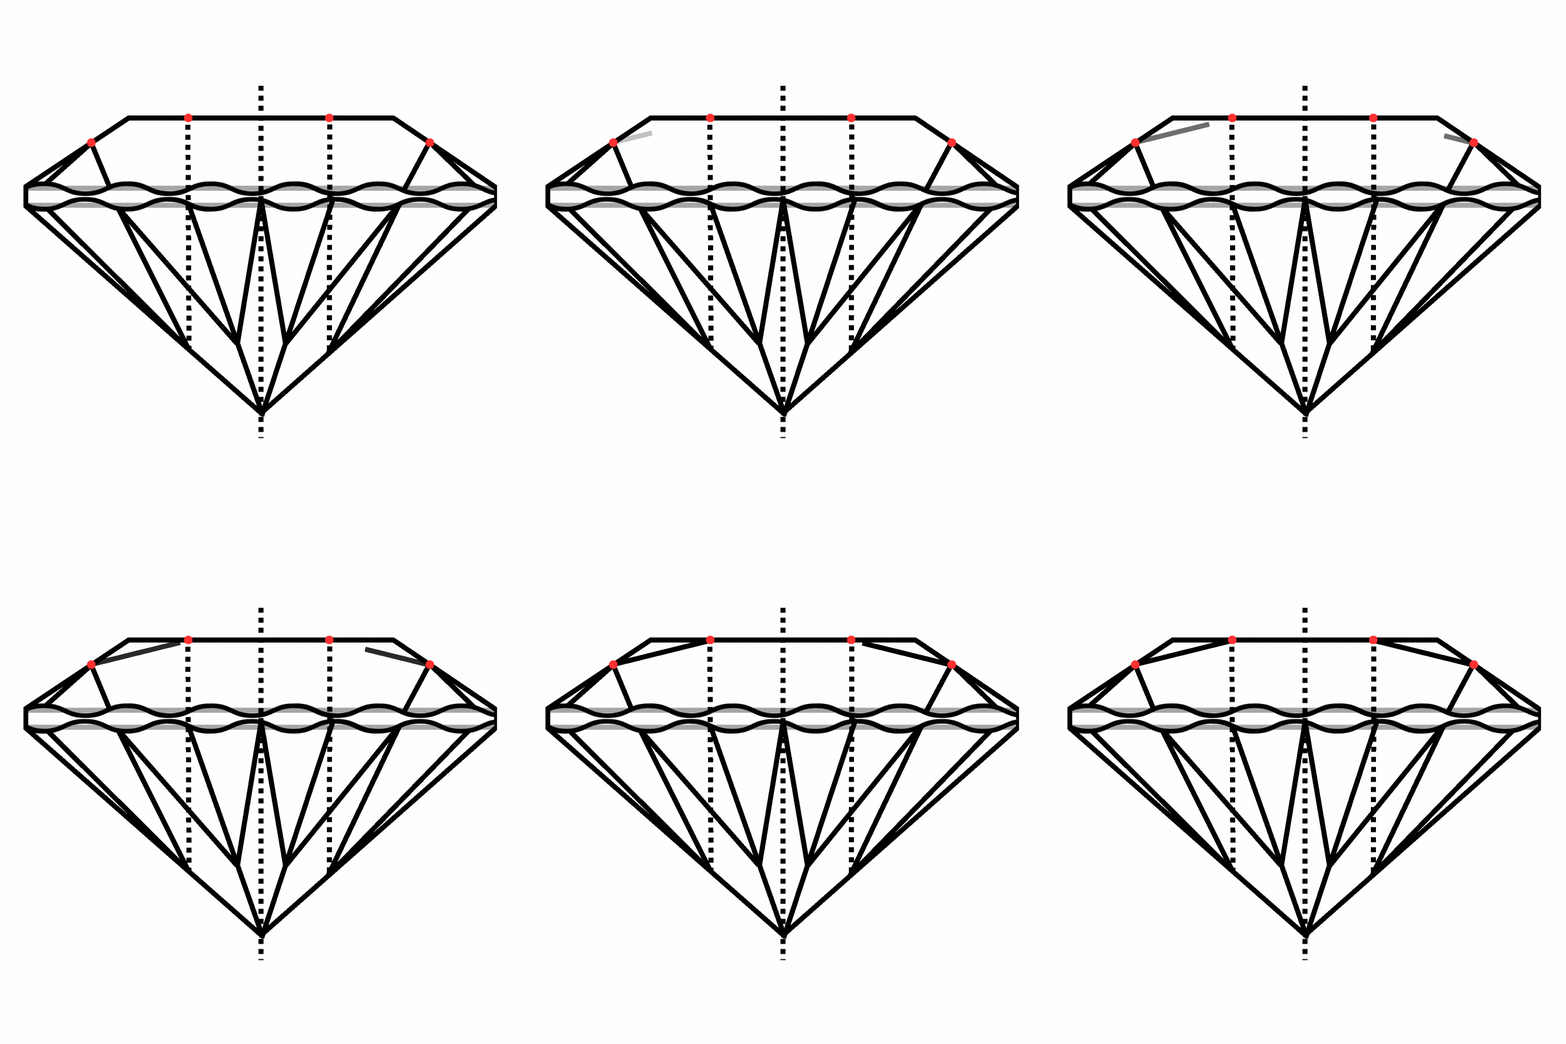
I join the points H and I, and then I mirror the line on the opposite half of the diamond.
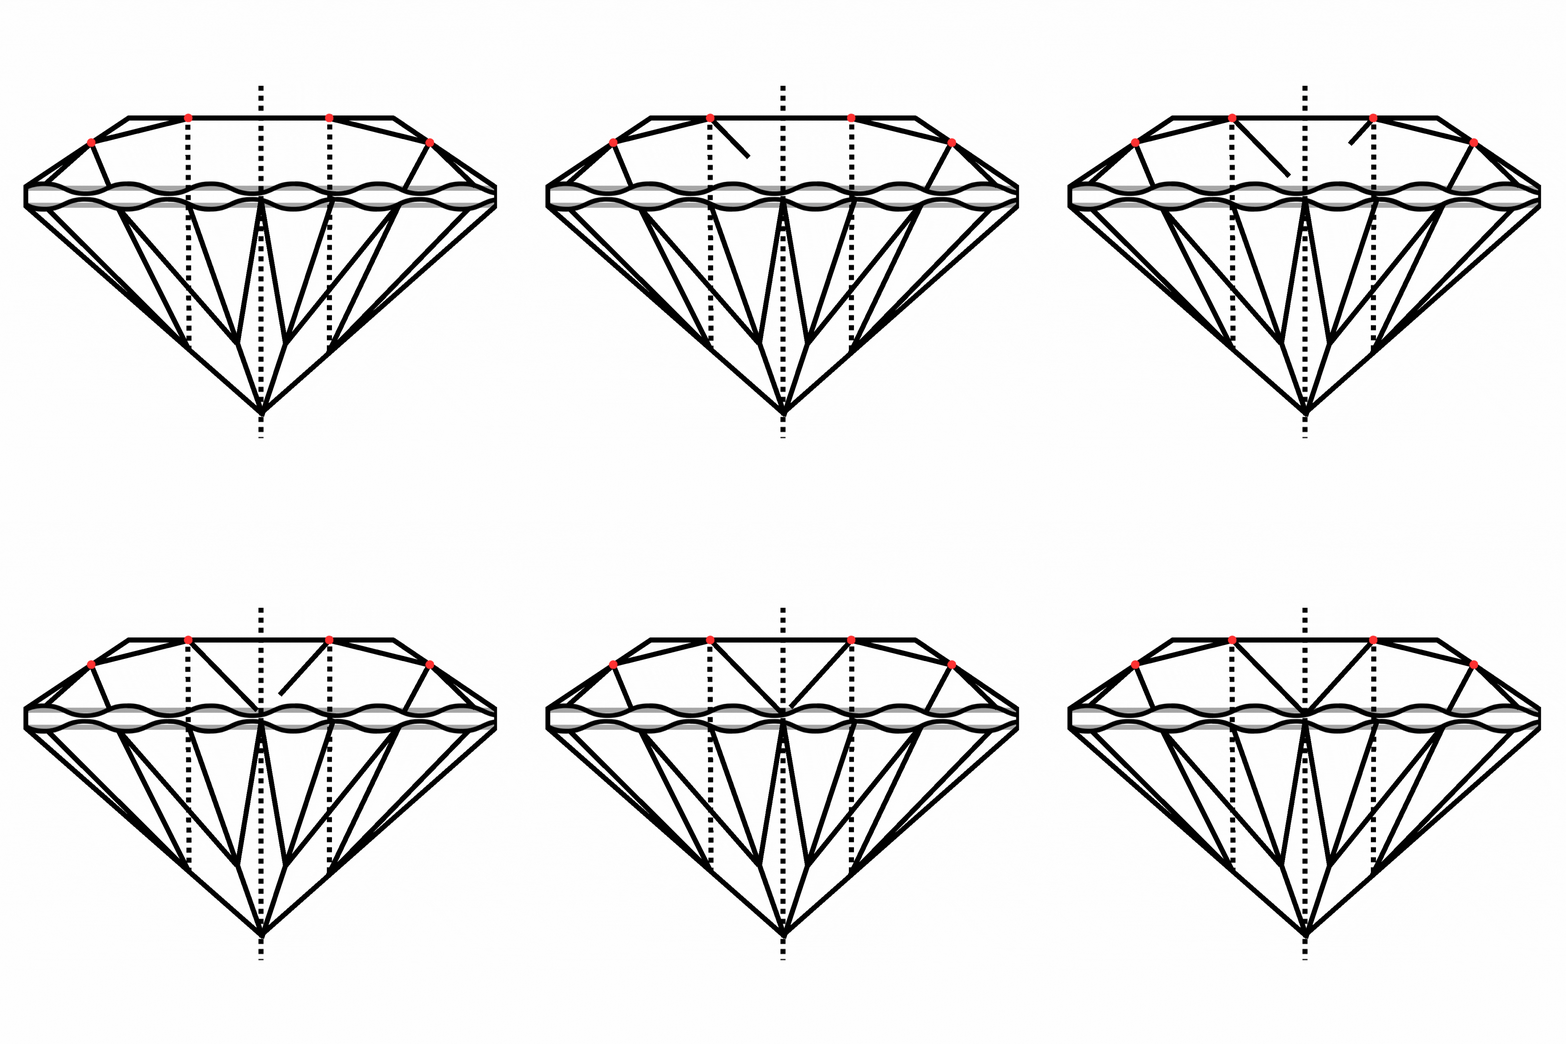
I add the point O₁ where the vertical line from the point O intersects the girdle, and a point O₂—where this line meets the top border of the diamond.
I connect the points O₁, H, and H₁.
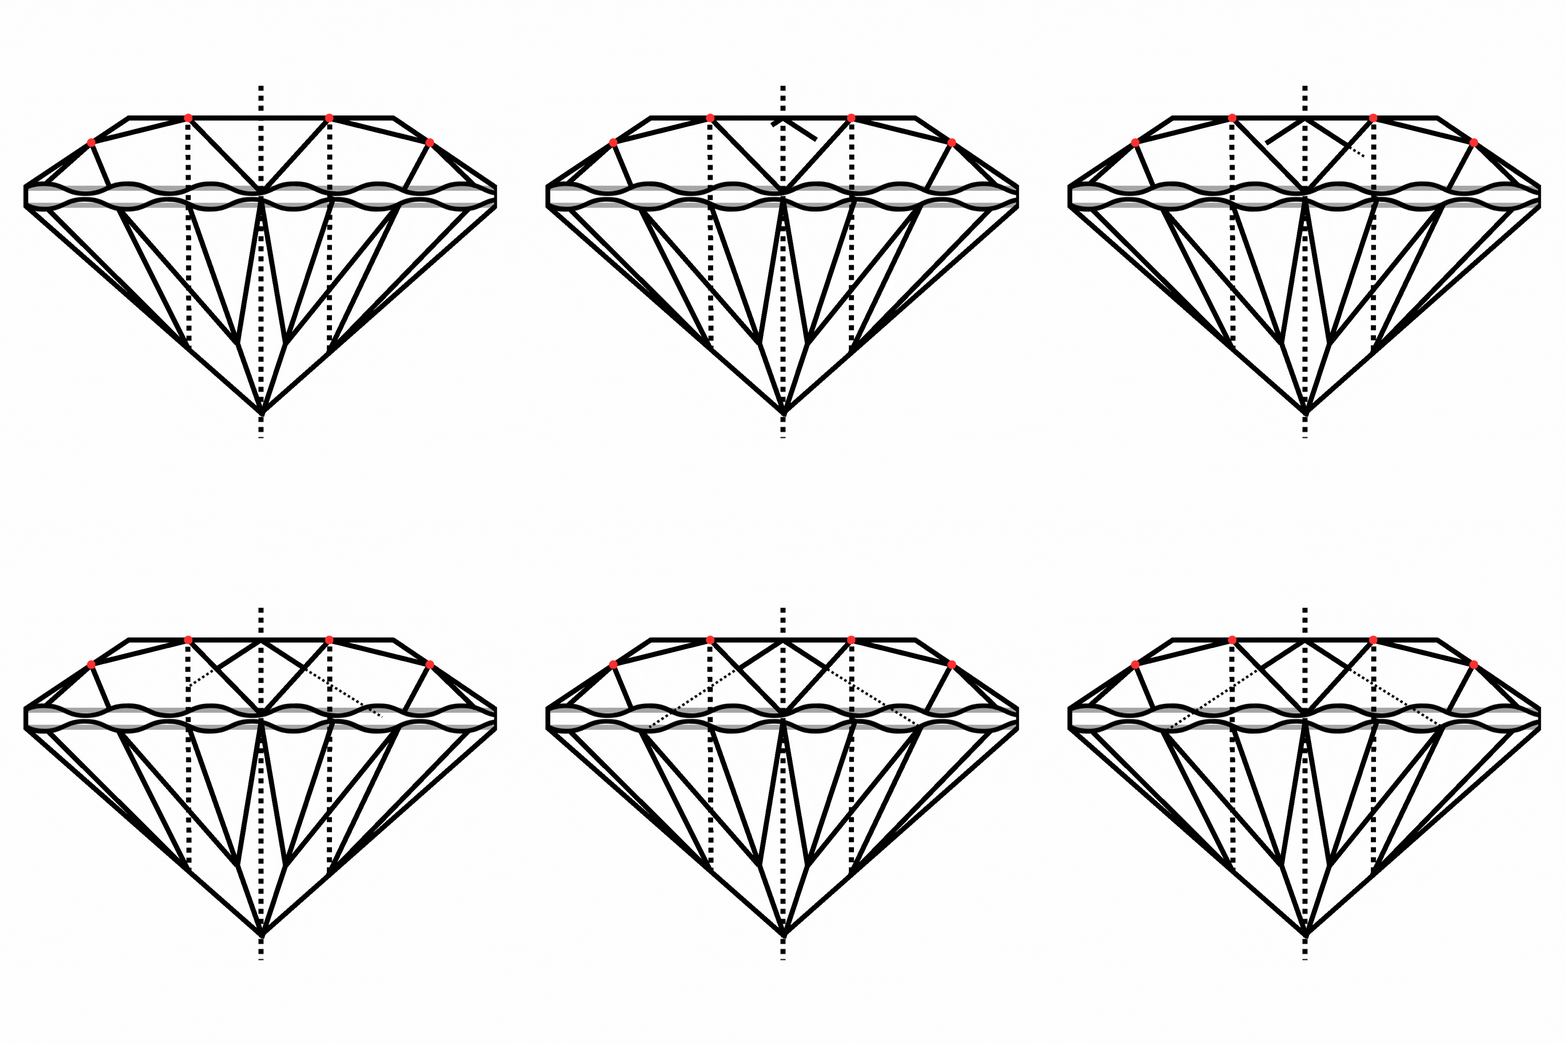
I draw diagonal lines from the point O₂. The line on the left side is directed to the point E, but we don't need it and the corresponding line to cross the O₁H and O₁H₁ segments.
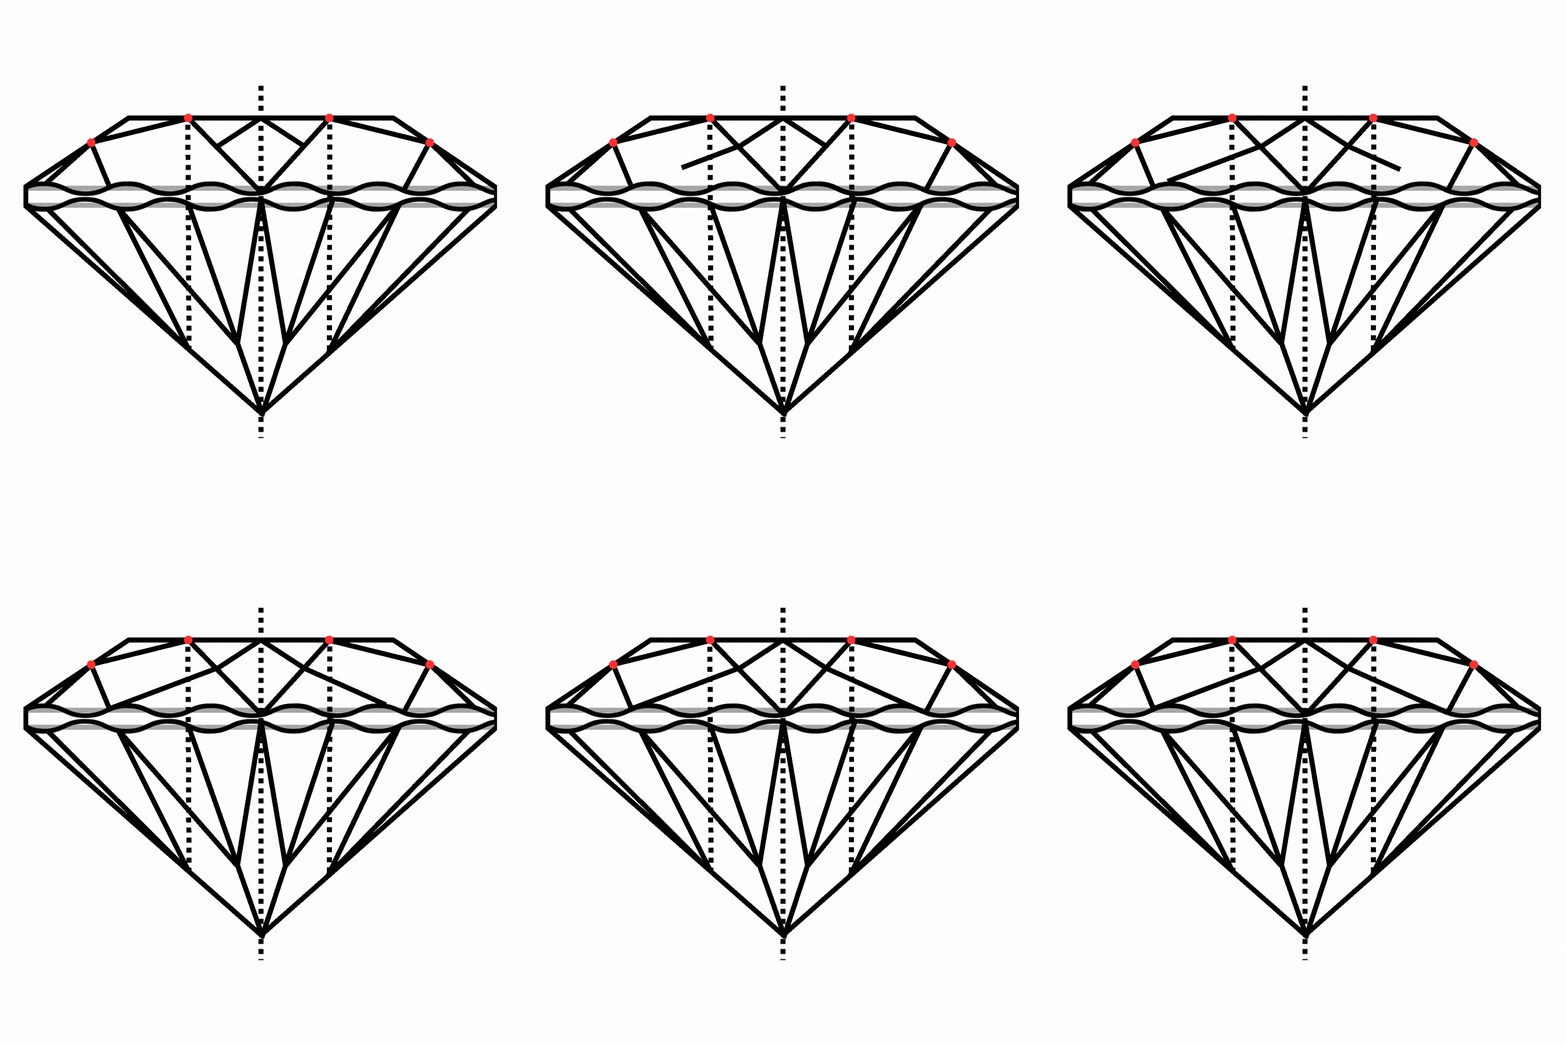
In the previous step, we got a small shape that resembles a rhombus; now I mark the side point of this shape with a letter J.
I draw a line that connects the point J with the prominence above the point E.
I repeat the same action on the opposite side of the diamond.
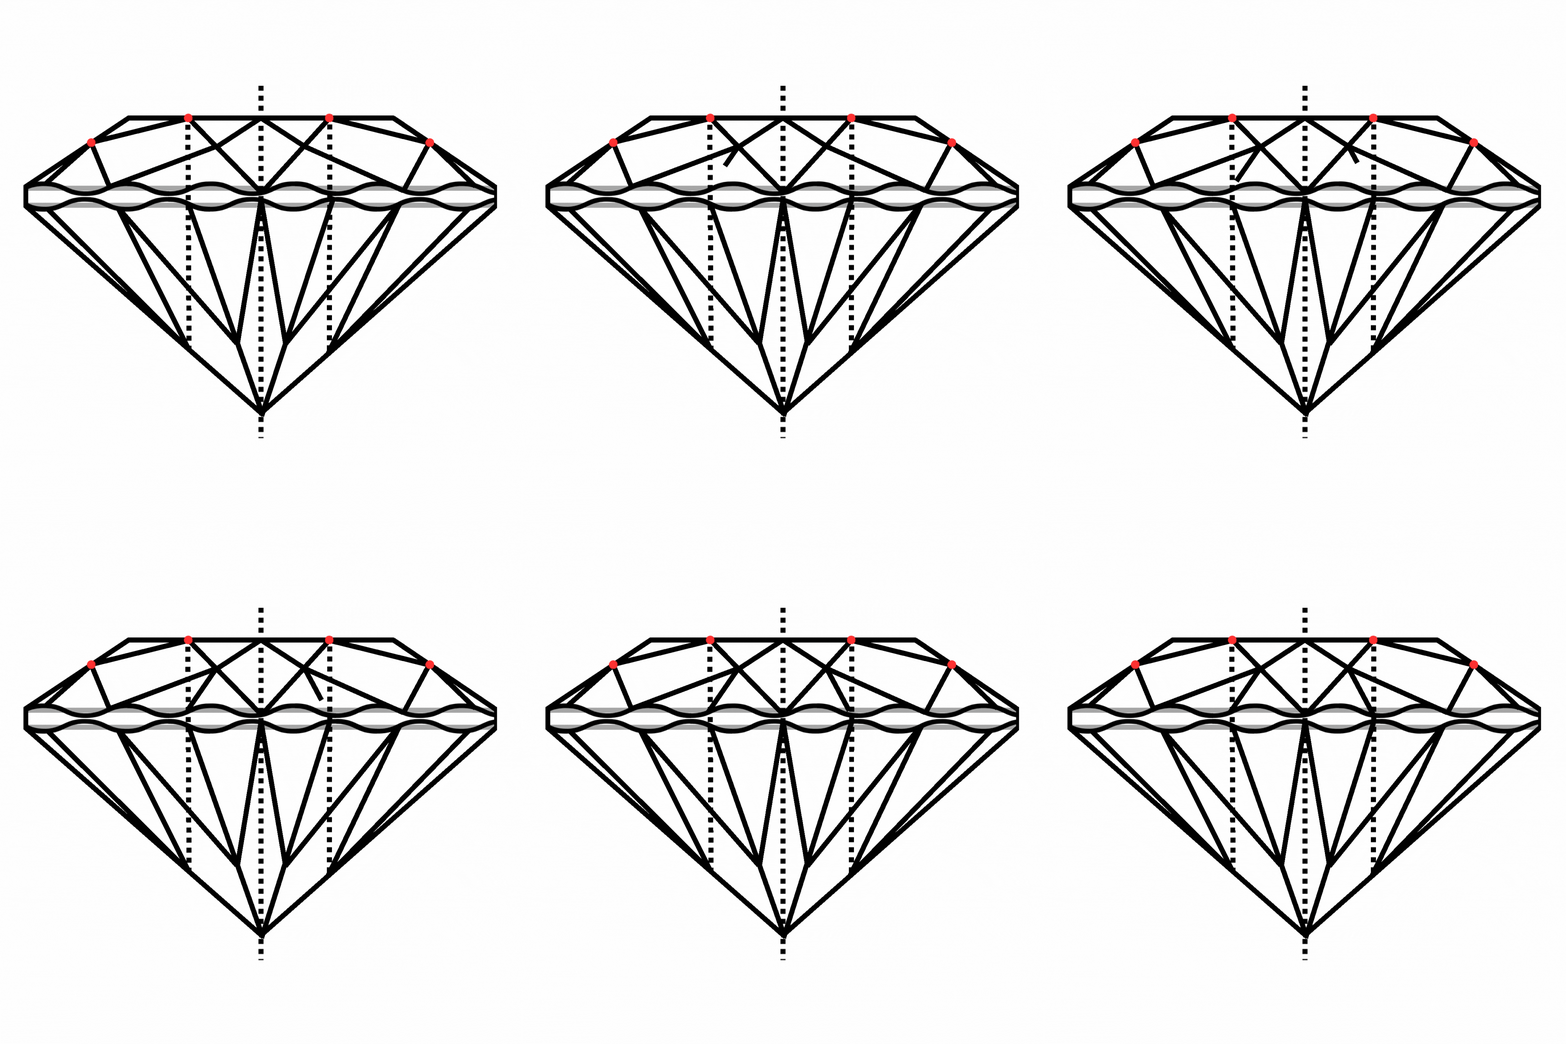
I join the point J with the prominence above the point C, and then add a corresponding line on the right side of the diamond.
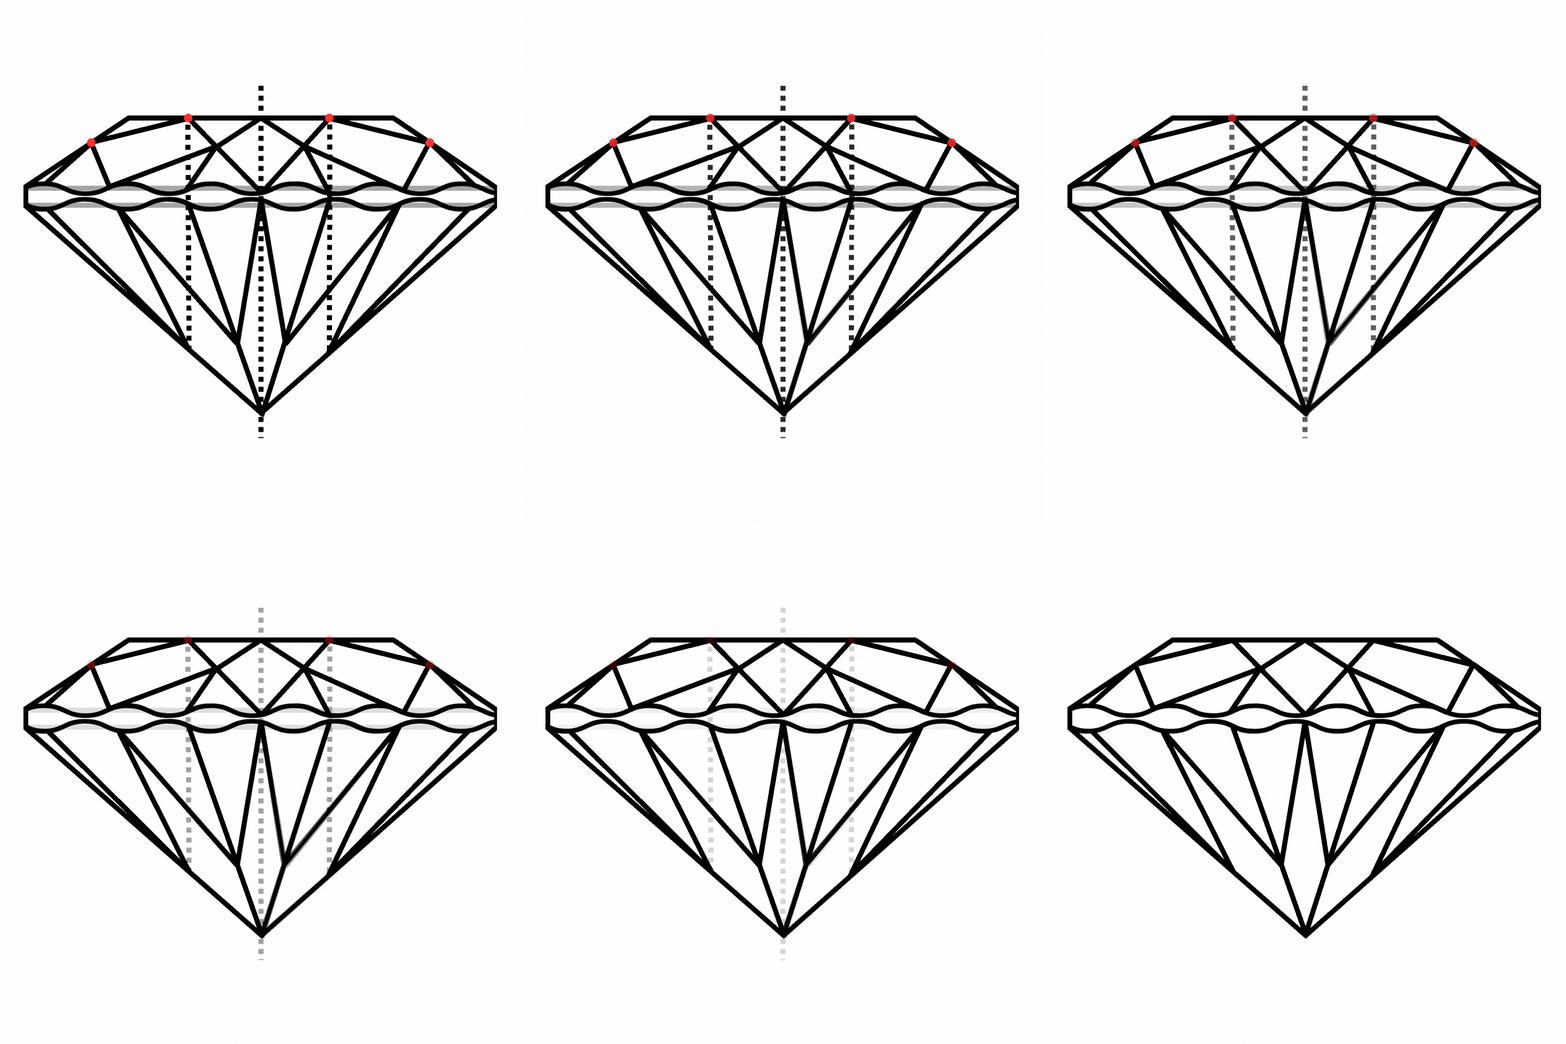
I outline the contours of the facets with the ink pen and erase the pencil marks. The diamond is complete!
Shading a diamond drawing is an important step in creating a realistic and three-dimensional image. The key to shading a diamond is to understand its facets and how they reflect and refract light.
To begin shading your diamond, first decide on the direction of your light source. This will determine which areas of the diamond will be in shadow and which will be highlighted. Typically, the light source is located above and to the left of the diamond.
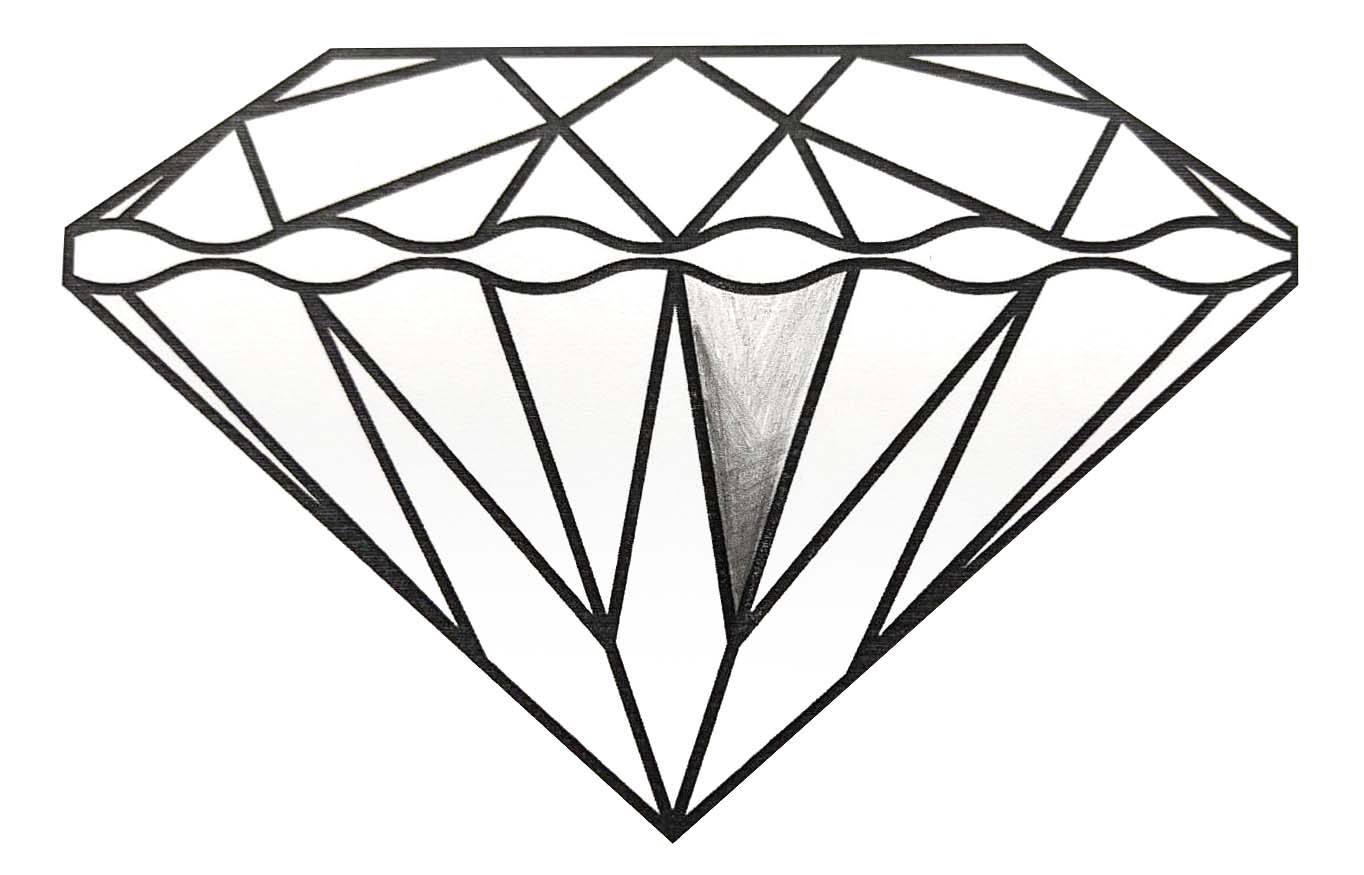
Next, begin shading the facets. Use a light touch and build up the shading gradually. Remember to shade in the direction of the facets, following their angles and curves.
Pay close attention to the areas where light is reflected or refracted, such as the table and the crown facets. These areas should be the brightest and most highlighted, while the areas in shadow will be darker.
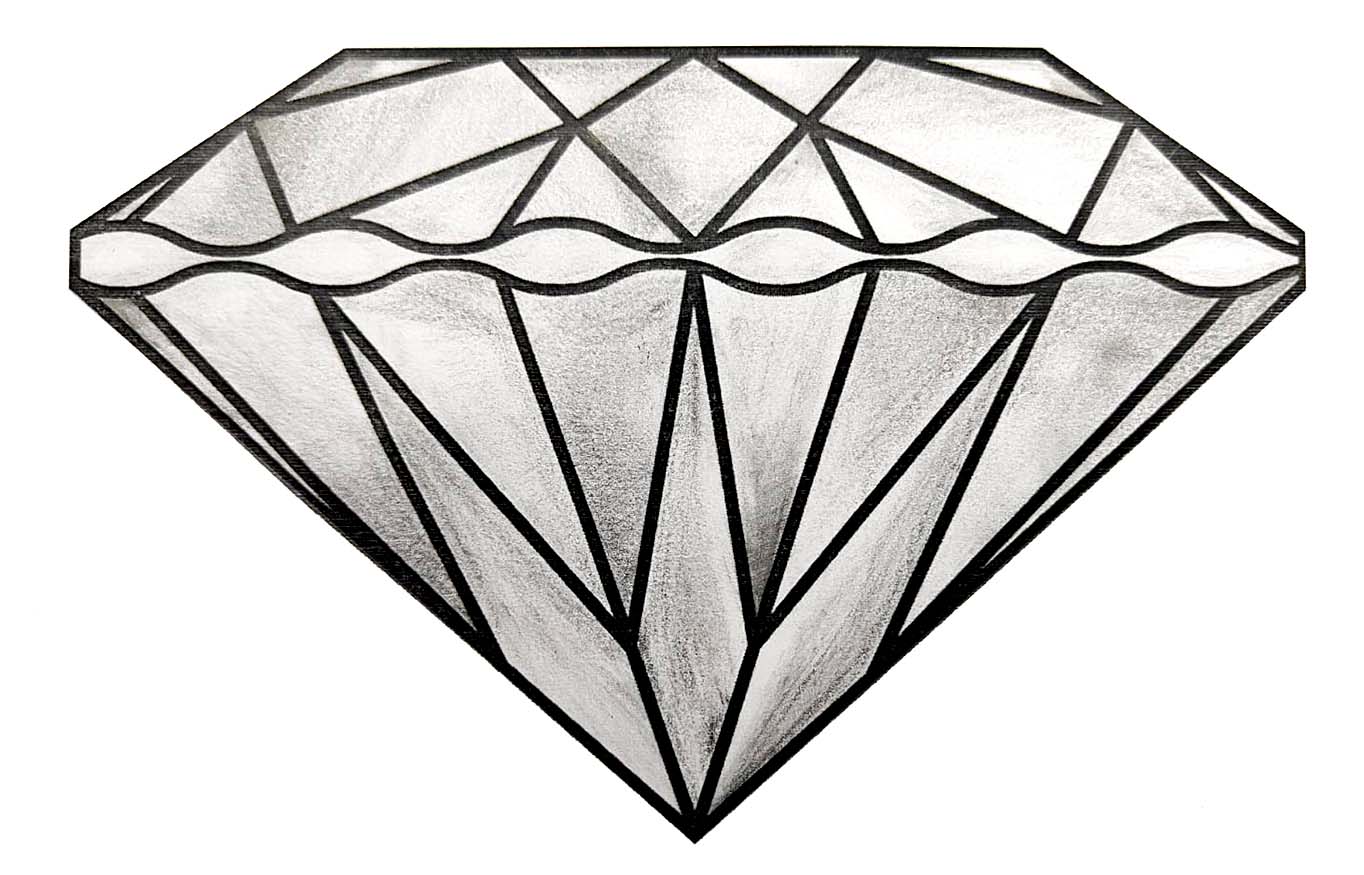
To add depth and dimension to your diamond drawing, use a range of shading techniques, such as hatching, cross-hatching, and blending. You can also use an eraser to create highlights in areas where the light is hitting the diamond directly.
Finally, once you have completed the shading, step back and evaluate your drawing. Make any necessary adjustments to ensure that the diamond appears three-dimensional and realistic.
Shading a diamond drawing takes practice and patience, but with time and effort, you can create a beautiful and lifelike image of this precious gemstone.